using System;
using System.Collections.Generic;
using System.Linq;
using System.Text;

namespace MessagingInCSharp
{
    class Program
    {
        static void Main( string[] args )
        {
            // Create a scene manager
            SceneManager sceneMgr = new SceneManager();

            // Have scene manager create an entity for us, which
            // automatically puts the object into the scene as well
            Entity myEntity = sceneMgr.CreateEntity();

            // Create a render component
            RenderComponent renderComp = new RenderComponent();

            // Attach render component to the entity we made
            myEntity.AddComponent(renderComp);

            // Set 'myEntity' position to (1, 2, 3)
            MsgSetPosition msgSetPos = new MsgSetPosition(myEntity.uniqueID, 1.0f, 2.0f, 3.0f);
            sceneMgr.SendMessage(msgSetPos);
            Console.WriteLine("Position set to (1, 2, 3) on entity with ID: " + myEntity.uniqueID);

            Console.WriteLine("Retreiving position from entity with ID: " + myEntity.uniqueID);

            // Get 'myEntity' position to verify it was set properly
            MsgGetPosition msgGetPos = new MsgGetPosition(myEntity.uniqueID);
            sceneMgr.SendMessage(msgGetPos);
            Console.WriteLine("X: " + msgGetPos.x);
            Console.WriteLine("Y: " + msgGetPos.y);
            Console.WriteLine("Z: " + msgGetPos.z);
        }
    }

    public enum MessageType
    {
        SetPosition,
        GetPosition
    }

    public class Vector3
    {
        public float x = 0.0f;
        public float y = 0.0f;
        public float z = 0.0f;
    }

    public class BaseMessage
    {
        public int destEntityID;
        public MessageType messageType;

        protected BaseMessage( int destinationEntityID, MessageType messageType )
        {
            this.destEntityID = destinationEntityID;
            this.messageType = messageType;
        }
    }

    public class PositionMessage : BaseMessage
    {
        public float x;
        public float y;
        public float z;

        protected PositionMessage( int destinationEntityID, MessageType messageType,
                                   float X = 0.0f, float Y = 0.0f, float Z = 0.0f) :
            base(destinationEntityID, messageType)
        {
            this.x = X;
            this.y = Y;
            this.z = Z;
        }
    }

    public class MsgSetPosition : PositionMessage
    {
        public MsgSetPosition( int destinationEntityID, float X, float Y, float Z ) :
            base(destinationEntityID, MessageType.SetPosition, X, Y, Z)
        {}
    }

    public class MsgGetPosition : PositionMessage
    {
        public MsgGetPosition( int destinationEntityID) :
            base(destinationEntityID, MessageType.GetPosition, 0.0f, 0.0f, 0.0f)
        {}
    }

    public abstract class BaseComponent
    {
        public virtual bool SendMessage( BaseMessage msg )
        {
            return false;
        }
    }

    public class RenderComponent : BaseComponent
    {
        public override bool SendMessage( BaseMessage msg )
        {
            // Entity has a switch for any messages it cares about
            switch (msg.messageType)
            {
                case MessageType.SetPosition:
                    {
                        // Update render mesh position/translation

                        Console.WriteLine("RenderComponent handling SetPosition");
                    }
                    break;
                default:
                    return base.SendMessage(msg);
            }

            return true;
        }
    }

    public class Entity
    {
        public int uniqueID;
        public int UniqueID
        {
            get { return this.uniqueID; }
            set { this.uniqueID = value; }
        }

        private Vector3 position = new Vector3();
        private List<BaseComponent> components = new List<BaseComponent>();

        public Entity( int uniqueID )
        {
            this.uniqueID = uniqueID;
        }

        public void AddComponent( BaseComponent component )
        {
            this.components.Add(component);
        }

        public bool SendMessage( BaseMessage msg )
        {
            bool messageHandled = false;

            // Entity has a switch for any messages it cares about
            switch (msg.messageType)
            {
                case MessageType.SetPosition:
                    {
                        MsgSetPosition msgSetPos = msg as MsgSetPosition;
                        position.x = msgSetPos.x;
                        position.y = msgSetPos.y;
                        position.z = msgSetPos.z;

                        messageHandled = true;
                        Console.WriteLine("Entity handled SetPosition");
                    }
                    break;
                case MessageType.GetPosition:
                    {
                        MsgGetPosition msgGetPos = msg as MsgGetPosition;
                        msgGetPos.x = position.x;
                        msgGetPos.y = position.y;
                        msgGetPos.z = position.z;

                        messageHandled = true;
                        Console.WriteLine("Entity handled GetPosition");
                    }
                    break;
                default:
                    return PassMessageToComponents(msg);
            }

            // If the entity didn't handle the message but the component
            // did, we return true to signify it was handled by something.
            messageHandled |= PassMessageToComponents(msg);

            return messageHandled;
        }

        private bool PassMessageToComponents( BaseMessage msg )
        {
            bool messageHandled = false;

            this.components.ForEach(c => messageHandled |= c.SendMessage(msg) );

            return messageHandled;
        }
    }

    public class SceneManager
    {
        private Dictionary<int, Entity> entities = new Dictionary<int,Entity>();
        private static int nextEntityID = 0;

        // Returns true if the entity or any components handled the message
        public bool SendMessage( BaseMessage msg )
        {
            // We look for the entity in the scene by its ID
            Entity entity;
            if ( entities.TryGetValue(msg.destEntityID, out entity) )
            {
                // Entity was found, so send it the message
                return entity.SendMessage(msg);
            }

            // Entity with the specified ID wasn't found
            return false;
        }

        public Entity CreateEntity()
        {
            Entity newEntity = new Entity(SceneManager.nextEntityID++);
            entities.Add(newEntity.UniqueID, newEntity);

            return newEntity;
        }
    }
}
Showing posts with label game engine. Show all posts
Showing posts with label game engine. Show all posts
Saturday, February 11, 2012
Game Engine Architecture, C#
Here's the same architecture as my last two posts, but this time in C# (the last two were in Scala and C++).

Game Engine Architecture, now in Scala
In my previous post I discussed game engine architecture, object<->component hierarchy, etc. Here's the sample architecture as the last post, but instead of C++ this version is written in Scala. One thing worth noting, we get identical functionality in this Scala example, with 35% less code!
package MessagingInScala

object GameMessageType extends Enumeration {
  type GameMessageType = Value

  val SetPosition = Value
  val GetPosition = Value
}
import GameMessageType._

class Vector3(var x: Float, var y: Float, var z: Float)

abstract class GameMessage (val destinationID: Int) {
  def messageType: GameMessageType
}

abstract class PositionMessage (destinationID: Int,
                                var x: Float, var y: Float,
                                var z: Float) extends GameMessage(destinationID) {
}

class MsgSetPosition(destinationID: Int,
                     x: Float, y: Float,
                     z: Float) extends PositionMessage(destinationID, x, y, z) {
  override val messageType = SetPosition
}
object MsgSetPosition {
  def Apply(destinationID: Int,
            x: Float, y: Float,
            z: Float) = new MsgSetPosition(destinationID, x, y, z)
}

class MsgGetPosition(destinationID: Int) extends PositionMessage(destinationID, 0.0f, 0.0f, 0.0f) {
  val messageType = GetPosition
}
object MsgGetPosition {
  def Apply(destinationID: Int) = new MsgGetPosition(destinationID)
}

abstract class BaseComponent {
  def SendMessage(message: GameMessage) = false
}

class RenderComponent extends BaseComponent {
  override def SendMessage(message: GameMessage): Boolean = {
    message.messageType match {
      case GameMessageType.SetPosition => {
        // Update render mesh position
        println("RenderComponent received SetPosition")
        true // Return value
      }
      case _ => super.SendMessage(message)
    }
  }
}

class Entity(ID: Int) {
  private var Components: List[BaseComponent] = List()
  var position: Vector3 = new Vector3(0.0f, 0.0f, 0.0f)
  val uniqueID: Int = ID

  def AddComponent(component: BaseComponent) {
    Components = component :: Components
  }

  def SendMessage(message: GameMessage): Boolean = {
    message.messageType match {
      case GameMessageType.SetPosition => {
        println("Entity received SetPosition")
        var msgSetPos: MsgSetPosition = message.asInstanceOf[MsgSetPosition]
        position.x = msgSetPos.x
        position.y = msgSetPos.y
        position.z = msgSetPos.z
        PassMessageToComponents(message) // This is also the return value
      }
      case GameMessageType.GetPosition => {
        println("Entity received GetPosition")
        var msgGetPos: MsgGetPosition = message.asInstanceOf[MsgGetPosition]
        msgGetPos.x = position.x
        msgGetPos.y = position.y
        msgGetPos.z = position.z
        PassMessageToComponents(message) // This is also the return value
      }
      case _ => PassMessageToComponents(message) // This is also the return value
    }
  }

  def PassMessageToComponents(message: GameMessage): Boolean = {
    var messageHandled = false
    Components.foreach(c => {
      messageHandled |= c.SendMessage(message)
    })

    messageHandled
  }
}

object Entity {
  var nextUUID: Int = 0
  def apply() = new Entity(nextUUID + 1)
}

class SceneManager {
  // You don't need to type the entire HashMap path like this, I'm
  // doing this so the reader understands this is not a Java HashMap
  var entities: Map[Int, Entity] = Map.empty[Int, Entity]

  def SendMessage(message: GameMessage): Boolean = {
    if ( entities.contains(message.destinationID) ) {
      entities(message.destinationID).SendMessage(message)
    } else {
      false
    }
  }

  def CreateEntity(): Entity = {
    val newEntity: Entity = Entity()
    entities += newEntity.uniqueID -> newEntity
    newEntity
  }
}


object Main extends App {
  val sceneMgr: SceneManager = new SceneManager

  val testEntity = sceneMgr.CreateEntity()
  val testRenderComp = new RenderComponent
  testEntity.AddComponent(testRenderComp)

  val msgSetPos: MsgSetPosition = new MsgSetPosition(testEntity.uniqueID, 1.0f, 2.0f, 3.0f)
  sceneMgr.SendMessage(msgSetPos)
  println("Position set to (1, 2, 3) on entity with ID " + testEntity.uniqueID)

  println("Retreiving position from object with ID: " + testEntity.uniqueID)

  val msgGetPos: MsgGetPosition = new MsgGetPosition(testEntity.uniqueID)
  sceneMgr.SendMessage(msgGetPos)
  println("X: " + msgGetPos.x)
  println("Y: " + msgGetPos.y)
  println("Z: " + msgGetPos.z)
}
Thursday, February 9, 2012
Game Engine Architecture, C++
I recently saw a question on Stack Overflow about engine architecture, specifically how to layout systems and communicate between them. My favorite engine architecture by far is an object<->component architecture. I posted a full working code sample as an answer to the question, along with details. Here's the link to the question, if you don't wish to follow the link, here's the full answer along with code. Enjoy!
My favorite game engine structure is the interface and object<->component model using messaging for communication between almost all parts.
You have multiple interfaces for main engine parts such as your scene manager, resource loader, audio, renderer, physics, etc.
I have the scene manager in charge of all objects in the 3D scene/world.
Object is a very atomic class, containing only a few things that are common to almost everything in your scene, in my engine the object class holds only position, rotation, a list of components, and a unique ID. Every object's ID is generated by a static int, so that no two objects will every have the same ID, this allows you to send messages to an object by its ID, rather than having to have a pointer to the object.
The list of components on the object is what gives that objects is main properties. For example, for something that you can see in the 3D world, you would give your object a render component that contains the information about the render mesh. If you want an object to have physics you would give it a physics component. If you want something to act as a camera, give it a camera component. The list of components can go on and on.
Communication between interfaces, objects, and components is key. In my engine I have a generic message class that contains only a unique ID, and a message type ID. The unique ID is the ID of the object you want the message to go to, and the message type ID is used by the object receiving the message so it knows what type of message it is.
Objects can handle the message if they need, and they can pass the message on to each of their components, and components will often do important things with the message. For example, if you want to change and object's position you send the object a SetPosition message, the object may update its position variable when it gets the message, but the render component may need to message to update the position of the render mesh, and the physics component may need the message to update the physics body's position.
Here is a very simple layout of scene manager, object, and component, and message flow, that I whipped up in about an hour, written in C++. When run it sets the position on an object, and the message passes through the render component, then retrieves the position from the object. Enjoy!
My favorite game engine structure is the interface and object<->component model using messaging for communication between almost all parts.
You have multiple interfaces for main engine parts such as your scene manager, resource loader, audio, renderer, physics, etc.
I have the scene manager in charge of all objects in the 3D scene/world.
Object is a very atomic class, containing only a few things that are common to almost everything in your scene, in my engine the object class holds only position, rotation, a list of components, and a unique ID. Every object's ID is generated by a static int, so that no two objects will every have the same ID, this allows you to send messages to an object by its ID, rather than having to have a pointer to the object.
The list of components on the object is what gives that objects is main properties. For example, for something that you can see in the 3D world, you would give your object a render component that contains the information about the render mesh. If you want an object to have physics you would give it a physics component. If you want something to act as a camera, give it a camera component. The list of components can go on and on.
Communication between interfaces, objects, and components is key. In my engine I have a generic message class that contains only a unique ID, and a message type ID. The unique ID is the ID of the object you want the message to go to, and the message type ID is used by the object receiving the message so it knows what type of message it is.
Objects can handle the message if they need, and they can pass the message on to each of their components, and components will often do important things with the message. For example, if you want to change and object's position you send the object a SetPosition message, the object may update its position variable when it gets the message, but the render component may need to message to update the position of the render mesh, and the physics component may need the message to update the physics body's position.
Here is a very simple layout of scene manager, object, and component, and message flow, that I whipped up in about an hour, written in C++. When run it sets the position on an object, and the message passes through the render component, then retrieves the position from the object. Enjoy!
#include <iostream>
#include <stdio.h>

#include <list>
#include <map>

using namespace std;

struct Vector3
{
public:
    Vector3() : x(0.0f), y(0.0f), z(0.0f)
    {}

    float x, y, z;
};

enum eMessageType
{
    SetPosition,
    GetPosition,
};

class BaseMessage
{
protected: // Abstract class, constructor is protected
    BaseMessage(int destinationObjectID, eMessageType messageTypeID)
        : m_destObjectID(destinationObjectID)
        , m_messageTypeID(messageTypeID)
    {}

public: // Normally this isn't public, just doing it to keep code small
    int m_destObjectID;
    eMessageType m_messageTypeID;
};

class PositionMessage : public BaseMessage
{
protected: // Abstract class, constructor is protected
    PositionMessage(int destinationObjectID, eMessageType messageTypeID,
                    float X = 0.0f, float Y = 0.0f, float Z = 0.0f)
        : BaseMessage(destinationObjectID, messageTypeID)
        , x(X)
        , y(Y)
        , z(Z)
    {

    }

public:
    float x, y, z;
};

class MsgSetPosition : public PositionMessage
{
public:
    MsgSetPosition(int destinationObjectID, float X, float Y, float Z)
        : PositionMessage(destinationObjectID, SetPosition, X, Y, Z)
    {}
};

class MsgGetPosition : public PositionMessage
{
public:
    MsgGetPosition(int destinationObjectID)
        : PositionMessage(destinationObjectID, GetPosition)
    {}
};

class BaseComponent
{
public:
    virtual bool SendMessage(BaseMessage* msg) { return false; }
};

class RenderComponent : public BaseComponent
{
public:
    /*override*/ bool SendMessage(BaseMessage* msg)
    {
        switch(msg->m_messageTypeID)
        {
        case SetPosition:
            {
                // Update render mesh position/translation

                cout << "RenderComponent handling SetPosition\n";
            }
            break;
        default:
            return BaseComponent::SendMessage(msg);
        }

        return true;
    }
};

class Object
{
public:
    Object(int uniqueID)
        : m_UniqueID(uniqueID)
    {
    }

    int GetObjectID() const { return m_UniqueID; }

    void AddComponent(BaseComponent* comp)
    {
        m_Components.push_back(comp);
    }

    bool SendMessage(BaseMessage* msg)
    {
        bool messageHandled = false;

        // Object has a switch for any messages it cares about
        switch(msg->m_messageTypeID)
        {
        case SetPosition:
            {
                MsgSetPosition* msgSetPos = static_cast<MsgSetPosition*>(msg);
                m_Position.x = msgSetPos->x;
                m_Position.y = msgSetPos->y;
                m_Position.z = msgSetPos->z;

                messageHandled = true;
                cout << "Object handled SetPosition\n";
            }
            break;
        case GetPosition:
            {
                MsgGetPosition* msgSetPos = static_cast<MsgGetPosition*>(msg);
                msgSetPos->x = m_Position.x;
                msgSetPos->y = m_Position.y;
                msgSetPos->z = m_Position.z;

                messageHandled = true;
                cout << "Object handling GetPosition\n";
            }
            break;
        default:
            return PassMessageToComponents(msg);
        }

        // If the object didn't handle the message but the component
        // did, we return true to signify it was handled by something.
        messageHandled |= PassMessageToComponents(msg);

        return messageHandled;
    }

private: // Methods
    bool PassMessageToComponents(BaseMessage* msg)
    {
        bool messageHandled = false;

        std::list<BaseComponent*>::iterator compIt = m_Components.begin();
        for ( compIt; compIt != m_Components.end(); ++compIt )
        {
            messageHandled |= (*compIt)->SendMessage(msg);
        }

        return messageHandled;
    }

private: // Members
    int m_UniqueID;
    std::list<BaseComponent*> m_Components;
    Vector3 m_Position;
};

class SceneManager
{
public:
    // Returns true if the object or any components handled the message
    bool SendMessage(BaseMessage* msg)
    {
        // We look for the object in the scene by its ID
        std::map<int, Object*>::iterator objIt = m_Objects.find(msg->m_destObjectID);
        if ( objIt != m_Objects.end() )
        {
            // Object was found, so send it the message
            return objIt->second->SendMessage(msg);
        }

        // Object with the specified ID wasn't found
        return false;
    }

    Object* CreateObject()
    {
        Object* newObj = new Object(nextObjectID++);
        m_Objects[newObj->GetObjectID()] = newObj;

        return newObj;
    }

private:
    std::map<int, Object*> m_Objects;
    static int nextObjectID;
};

// Initialize our static unique objectID generator
int SceneManager::nextObjectID = 0;

int main()
{
    // Create a scene manager
    SceneManager sceneMgr;

    // Have scene manager create an object for us, which
    // automatically puts the object into the scene as well
    Object* myObj = sceneMgr.CreateObject();

    // Create a render component
    RenderComponent* renderComp = new RenderComponent();

    // Attach render component to the object we made
    myObj->AddComponent(renderComp);

    // Set 'myObj' position to (1, 2, 3)
    MsgSetPosition msgSetPos(myObj->GetObjectID(), 1.0f, 2.0f, 3.0f);
    sceneMgr.SendMessage(&msgSetPos);
    cout << "Position set to (1, 2, 3) on object with ID: " << myObj->GetObjectID() << '\n';

    cout << "Retreiving position from object with ID: " << myObj->GetObjectID() << '\n';

    // Get 'myObj' position to verify it was set properly
    MsgGetPosition msgGetPos(myObj->GetObjectID());
    sceneMgr.SendMessage(&msgGetPos);
    cout << "X: " << msgGetPos.x << '\n';
    cout << "Y: " << msgGetPos.y << '\n';
    cout << "Z: " << msgGetPos.z << '\n';
}
Wednesday, December 28, 2011
QuickStart Engine v0.26 Preview, Nuclex GUI
For a long time now I've wanted a single GUI in the QuickStart Engine's demo, to make things easier to learn, and over the last few weeks I've been thinking that if I am going to go through the trouble of setting up a GUI for the demo that I might as well setup the GUI such that the user could put it in their own games. However programming a full featured GUI is a very large task, the Nuclex GUI framework alone has almost as many code files as the QuickStart Engine! There was really no need to write my own GUI so I decided to find a GUI framework suitable to be used in C#, XNA, and games, and I believe I've found that with the Nuclex GUI framework.
Here's a screenshot of a simple draggable window in the game with a couple of buttons.

Before this is released I'll want to expose simple ways of connecting the GUI to a game (for example, letting buttons send game messages might be handy), and I would also like to be able to control the transparency of the window. I would like to just include the Nuclex binary files (.dlls) in the project rather than include the Nuclex GUI sourcecode, but it looks like I might have to make some changes to get the transparency stuff that I want.
Here's a screenshot of a simple draggable window in the game with a couple of buttons.

Before this is released I'll want to expose simple ways of connecting the GUI to a game (for example, letting buttons send game messages might be handy), and I would also like to be able to control the transparency of the window. I would like to just include the Nuclex binary files (.dlls) in the project rather than include the Nuclex GUI sourcecode, but it looks like I might have to make some changes to get the transparency stuff that I want.
Thursday, December 15, 2011
QuickStart Game Engine v0.25 Preview: Buoyancy/Density Physics
I'm currently working on v0.25 of the QuickStart Game Engine, which will include a handful of performance enhancements, but most of the work has gone into a new component called WaterVolumePhysicsComponent. This component lets you describe a volumetric region in which water physics will be applied to any dynamic physics body, this means that water will now apply drag to anything within it, it will apply a weight to objects as they leave the water (because they're still "wet"), and it will take into account the density differences between the water and the physics body, allowing less dense entities to float, and denser entities to sink. The density differences between the body and water will also determine if the entity just barely sits near the top of the water, or if it's incredibly light it will float almost entirely on top of the water.
In previous versions of the engine there has been a yellow sphere that could be fired by pressing spacebar, in the new demo there will be two new spheres, a blue one fired by pressing Left Ctrl, and a red one fired by pressing Left Shift. The blue sphere will be extremely light, letting it rise very quickly out of the water and float almost entirely on top of the water, the yellow sphere will be medium density which is slightly less dense than water, letting it float to the top but not sit as high above the water as the blue sphere, and the red sphere will be very heavy and dense, letting it sink to the bottom of the water.
Density is really all that matters in terms of buoyancy in the water, but it also affects the amount of force and momentum an object has; All 3 spheres are the same size, but different densities, so each sphere weighs much differently than another. If you fire a blue sphere at one of the wooden crates in the demo, it doesn't have enough weight to move the crate almost at all, but the yellow sphere can give it a small nudge because it's a higher weight, and the red sphere can knock the crates around pretty good because they're much heavier than the crates. It is fun to fire the different spheres at things and watch how they act differently in the water.

I expect version 0.25 to be released in the next week or two.
In previous versions of the engine there has been a yellow sphere that could be fired by pressing spacebar, in the new demo there will be two new spheres, a blue one fired by pressing Left Ctrl, and a red one fired by pressing Left Shift. The blue sphere will be extremely light, letting it rise very quickly out of the water and float almost entirely on top of the water, the yellow sphere will be medium density which is slightly less dense than water, letting it float to the top but not sit as high above the water as the blue sphere, and the red sphere will be very heavy and dense, letting it sink to the bottom of the water.
Density is really all that matters in terms of buoyancy in the water, but it also affects the amount of force and momentum an object has; All 3 spheres are the same size, but different densities, so each sphere weighs much differently than another. If you fire a blue sphere at one of the wooden crates in the demo, it doesn't have enough weight to move the crate almost at all, but the yellow sphere can give it a small nudge because it's a higher weight, and the red sphere can knock the crates around pretty good because they're much heavier than the crates. It is fun to fire the different spheres at things and watch how they act differently in the water.

I expect version 0.25 to be released in the next week or two.
Tuesday, December 6, 2011
QuickStart Engine v0.24 coming soon
I've been hard at work on the next version of the QuickStart Engine, trying to get some much needed features into the engine while I still have some free time. I predict I'll have this next version checked in within the next few days.
Here's my changelist so far:
Features:

Here's my changelist so far:
- Messages now have a new member called 'protocol'. This gives the message properties so that it can not return after being handled by a single source, but also continue on to other components. It also lets the sender and handler know the intent of the message, for example, a SetPosition message has 'Broadcast' type, which means it is going to be broadcasting a change from the sender of the message to any component that is listening. In contrast, a GetPosition message has 'Request' type, which means only a single component should handle the message, and the handler is expected to return new information in the message. And finally there is the 'Accumulate' method, which allows the user to send the message to multiple components, and each one will have a chance to make changes or add to the data.
- ViewMatrix, ProjectionMatrix, and ViewFrustum data members in BaseEntity were moved to the CameraComponent class. This will save on memory by not having these exist on every entity, and also will remove clutter from the BaseEntity class. This did cause some changes to the variables passed through various functions, mostly in the GraphicsSystem class.
- When using the QSGame.QueueMessage method message protocol is enforced, to prevent the user from sending a request message, which would fail because request messages must immediately return results to the caller.
- Changed the default physics deactivation values for the engine, added constants for this that can be changed based on the game and scale used. This will result in a better framerate when there are lots of dynamic physics objects in a scene.
- Entities and components now receive a call to a new function called 'AddedToScene', which is called whenever the entity is added to a scene. This allows the entity and components to do things that normally required a game message to be sent, which couldn't be done until an entity was in the scene.
- LightComponents no longer need to have InitializeLightDirection() called manually on them to properly rotate the light, this is now done automatically within the component.
- Entities with SkyComponents no longer need to be manually attached to the camera, they will now handle this on their own.
- GeometricPrimitiveType enum uses 'Box' now instead of 'Cube', to match the ShapeType enum.
- Terrain (which was a class derived from BaseEntity) is now TerrainComponent and is derived from BaseComponent. This makes it easier to load Terrain through the new loading method (XML templates).
- Constant movement component now allows for a constant direction movement, not just sine-wave type of movements.
- The current render camera is now notified of any changes to graphics settings.
- Light direction shader parameter now has a correct .W value of 1.0 rather than 0.0
- Cameras will now automatically assume the aspect ratio of the viewport/window rather than defaulting to a specific preset value (unless you explicitly define one).
Features:
- Entities and Components can now be loaded entirely from XML definition files. This is a large step towards supporting a level editor that can save out entire scenes in a compact format. In the mean time it means that designer types can create entities through XML rather than C#.
- Multi-sampling anti-aliasing should work once again. Edit your settings.xml and set "IsMultiSampling" to true to use it, but be aware on PC it will generally cut the framerate in half.
- Texturing and normal mapping now work properly. Demo has been setup with a couple of textured and normal mapped entities.
- Ability to create physics box and sphere shapes based on the vertices in a model. This allows you take a model and wrap it in box or sphere physics. Previous this only worked with TriangleMesh shapes which are static so their uses are limited.
- The full component list stored in BaseEntity is now a dictionary with a 'key' of ComponentType. This allows programmers to easily get a component from an Entity for direct access as an alternative to creating and sending game messages.
- New physics class for Terrain, called TerrainPhysicsComponent. This allowed us to move all heightfield specific physics out of the PhysicsComponent and into its own class. This also makes it easier to load terrain.

Tuesday, November 29, 2011
QuickStart Engine v0.23 released!
For a year my open-source game engine for XNA had been incompatible with the newest version of XNA (version 4.0). With work and other responsibilities I hadn't had the time to get to updating it until recently. So for anyone interested in a basic game engine for XNA 4.0, here you go:
http://quickstartengine.codeplex.com/
If you just want to try out the demo program, try this link:
http://quickstartengine.codeplex.com/releases/view/77590#DownloadId=308132
These are screenshots from v0.22, but it's visually almost identical to v0.23


http://quickstartengine.codeplex.com/
If you just want to try out the demo program, try this link:
http://quickstartengine.codeplex.com/releases/view/77590#DownloadId=308132
These are screenshots from v0.22, but it's visually almost identical to v0.23
Friday, November 25, 2011
Converting the Quickstart Game Engine to XNA 4.0
Microsoft made a lot of changes to XNA between 3.1 and 4.0, and only recently have I had the time to look into converting the Quickstart Game Engine to run in XNA 4.0.
Here's Shawn Hargreaves list of breaking changes (changes that will break the engine) in XNA 4.0:
http://blogs.msdn.com/b/shawnhar/archive/2010/03/16/breaking-changes-in-xna-game-studio-4-0.aspx
Some of these are a real pain, specifically the fact that they got rid of point sprites, which the particle system uses, and clipping planes, which the water planes use to render reflections and refractions.
Those are the two that I'll be struggling with for the next couple of days, but hopefully I'll soon have the engine running on XNA 4.0. I've also identified some possible significant performance benefits I may implement as well.
Stay tuned.
Screenshot from Quickstart Engine 0.22 (running on XNA 3.1):

Here's Shawn Hargreaves list of breaking changes (changes that will break the engine) in XNA 4.0:
http://blogs.msdn.com/b/shawnhar/archive/2010/03/16/breaking-changes-in-xna-game-studio-4-0.aspx
Some of these are a real pain, specifically the fact that they got rid of point sprites, which the particle system uses, and clipping planes, which the water planes use to render reflections and refractions.
Those are the two that I'll be struggling with for the next couple of days, but hopefully I'll soon have the engine running on XNA 4.0. I've also identified some possible significant performance benefits I may implement as well.
Stay tuned.
Screenshot from Quickstart Engine 0.22 (running on XNA 3.1):
Friday, November 18, 2011
Let's Make a Game Engine for XNA 4.0r, Part 5, RenderDescriptions, Vertex Declaration, and everything else
In Part 4 of this series we covered the Render and Camera Components. RenderComponent uses RenderDescriptions to hold information about its mesh so the RenderManager can render it, and that RenderDescription holds either a Model (which is a standard XNA class), or a GeometricPrimitive (which is part of this engine).
GeometricPrimitive
GeometricPrimitive is a base class I've built into the engine, but it was written by Microsoft's XNA team as part of a sample, as such I'm not going to cover much about it other than the basics. There are 7 files that are part of this system, and I modified each one slightly to be part of the project, if you're creating your own project rather than using the downloaded one you'll want to just copy the GeometricPrimitives directory out of the download project into your project, and you'll need to make sure the namespaces match within each file as well.
GeometricPrimitive takes a GraphicsDevice as part of its constructor. Based on the shape of the primitive it constructs a VertexBuffer, a list of its verticies, an IndexBuffer, and a list of its indices. Based on those variables we will have enough information to render the primitive. The only changes I made to these classes after putting them into this engine was to remove the #regions, and I pulled the BasicEffect out of the class itself since the RenderManager handles the rendering. Most importantly, I added the enum GeometricPrimitiveType to the GeometricPrimitive.cs file to allow users to use an enum type to create a shape for them:
Here is a link to the original Geometric Primitives sample if you would like to learn more:
http://create.msdn.com/en-US/education/catalog/sample/primitives_3d
VertexPositionNormal
This class is an IVertexType (which is a standard XNA type). When creating a list of vertices you need to have a vertex type, this is the vertex type used by the Geometric Primitives, this file is also from Microsoft's sample. Place VertexPositionNormal.cs in the RenderManager folder. Here's the entire file:
RenderDescription
RenderDescription is a data class, it holds no functionality, just holds data that can be passed between a RenderComponent and the RenderManager. Create RenderDescription.cs and place it inside of the RenderManager folder. The data RenderDescription holds is:
A Model (XNA's Model Class), or a GeometricPrimitive. It shouldn't hold both, the RenderManager will check if the Model exists first, and if it doesn't it will then check for a GeometricPrimitive, there's no reason to use both. This class also holds the worldTransform Matrix. And that's it. Here's the entire file:
EngineCommon
This is a file that will contain common constants used throughout the project. Create a file called EngineCommon.cs and place it in the main GameEngine folder (same level as Main.cs). Right now this just contains a variable for the name of the default root entity. Here's the entire file:
And that's it for our first milestone. At this point you got a lot of good practice watching the engine come together, and if you made your own files and code as you went along you should know it pretty well. Along the way there was a good chance for a typo on either my or your part, if your project doesn't compile I recommend just using the downloaded version of the engine, and if you want to change things around a little feel free to alter it to your liking, the license on the engine is such that you can do whatever you want with it.
So let's run the engine (press F5 to build and run attached), and what we should get is two loaded entities, one is the root entity, and the other is a primitive cube in front of the camera.

And there we have it. Now lets reflect back on things a bit. We took an awfully long time to make a program that renders a cube, we could have done it in about 1/10th the time, with much less code. However, the goal wasn't really to make a cube rendering program, what we wanted was the start to a flexible game engine that is extensible and reusable. If you think about it we could very easily change the program to render a stack of cubes, so let's give that a shot. If you remember the place we're temporarily using to load entities into our scene is within the SceneManager, so open that up and look for LoadContent().
Add this at the bottom of the function (but within the temporary lines comments):
And now we see this:

After some new additions to the engine it'll be able to do a lot more than this. From here on I won't be going into as much detail about setting everything up line by line, I will publish new versions of the engine that you can download, and I will go into some detail about new functionality. The biggest reason for this is because it takes a lot longer to blog about making an engine than it does to actually make it. I made this entire engine as you see it now in 7 hours, and it took about 15 hours to blog about it. The idea behind this project is that I will create a simple but extensive framework from which I will be able to create demos and samples that I can post on my blog, and the posted sample and code will relate to each other without me having to describe the entire engine to the use. For example if I want to create a spline cinematic camera demo, and I did it from scratch, there would be a ton of code in there that most people do not care about, now the engine can take place of that code and sit hidden from view so people can concentrate on the math and features behind such a camera system.
I will keep you guys posted on new versions of the engine, as well as posting samples that use the engine. Thanks for reading!
GeometricPrimitive
GeometricPrimitive is a base class I've built into the engine, but it was written by Microsoft's XNA team as part of a sample, as such I'm not going to cover much about it other than the basics. There are 7 files that are part of this system, and I modified each one slightly to be part of the project, if you're creating your own project rather than using the downloaded one you'll want to just copy the GeometricPrimitives directory out of the download project into your project, and you'll need to make sure the namespaces match within each file as well.
GeometricPrimitive takes a GraphicsDevice as part of its constructor. Based on the shape of the primitive it constructs a VertexBuffer, a list of its verticies, an IndexBuffer, and a list of its indices. Based on those variables we will have enough information to render the primitive. The only changes I made to these classes after putting them into this engine was to remove the #regions, and I pulled the BasicEffect out of the class itself since the RenderManager handles the rendering. Most importantly, I added the enum GeometricPrimitiveType to the GeometricPrimitive.cs file to allow users to use an enum type to create a shape for them:
public enum GeometricPrimitiveType
{
    Cube,
    Sphere,
    Cylinder,
    Torus,
    Teapot
}
If you look in the downloaded version of the engine you'll notice a 6th primitive shape called a BezierPrimitive. This isn't used directly, it is used by the TeapotPrimitive.Here is a link to the original Geometric Primitives sample if you would like to learn more:
http://create.msdn.com/en-US/education/catalog/sample/primitives_3d
VertexPositionNormal
This class is an IVertexType (which is a standard XNA type). When creating a list of vertices you need to have a vertex type, this is the vertex type used by the Geometric Primitives, this file is also from Microsoft's sample. Place VertexPositionNormal.cs in the RenderManager folder. Here's the entire file:
using Microsoft.Xna.Framework;
using Microsoft.Xna.Framework.Graphics;

namespace SimpleGameEngine.Render
{
    ///
    /// Custom vertex type for vertices that have just a
    /// position and a normal, without any texture coordinates.
    ///
    public struct VertexPositionNormal : IVertexType
    {
        public Vector3 Position;
        public Vector3 Normal;

        ///
        /// Constructor.
        ///
        public VertexPositionNormal(Vector3 position, Vector3 normal)
        {
            Position = position;
            Normal = normal;
        }

        ///
        /// A VertexDeclaration object, which contains information about the vertex
        /// elements contained within this struct.
        ///
        public static readonly VertexDeclaration VertexDeclaration = new VertexDeclaration
        (
            new VertexElement(0, VertexElementFormat.Vector3, VertexElementUsage.Position, 0),
            new VertexElement(12, VertexElementFormat.Vector3, VertexElementUsage.Normal, 0)
        );

        VertexDeclaration IVertexType.VertexDeclaration
        {
            get { return VertexPositionNormal.VertexDeclaration; }
        }

    }
}
RenderDescription
RenderDescription is a data class, it holds no functionality, just holds data that can be passed between a RenderComponent and the RenderManager. Create RenderDescription.cs and place it inside of the RenderManager folder. The data RenderDescription holds is:
A Model (XNA's Model Class), or a GeometricPrimitive. It shouldn't hold both, the RenderManager will check if the Model exists first, and if it doesn't it will then check for a GeometricPrimitive, there's no reason to use both. This class also holds the worldTransform Matrix. And that's it. Here's the entire file:
using System;
using System.Collections.Generic;
using System.Text;

using Microsoft.Xna.Framework;
using Microsoft.Xna.Framework.Graphics;

using SimpleGameEngine.GeometricPrimitives;

namespace SimpleGameEngine.Render
{
    public class RenderDescription
    {
        // A render description must contain either a Model, or
        // a GeometricPrimitive

        public Model model;
        public GeometricPrimitive geoPrim;

        public Matrix worldTransform = Matrix.Identity;

        public RenderDescription()
        {

        }
    }
}
EngineCommon
This is a file that will contain common constants used throughout the project. Create a file called EngineCommon.cs and place it in the main GameEngine folder (same level as Main.cs). Right now this just contains a variable for the name of the default root entity. Here's the entire file:
using System;
using System.Collections.Generic;
using System.Text;

namespace SimpleGameEngine
{
    public class EngineCommon
    {
        public const String RootEntityName = "Root";
    }
}
And that's it for our first milestone. At this point you got a lot of good practice watching the engine come together, and if you made your own files and code as you went along you should know it pretty well. Along the way there was a good chance for a typo on either my or your part, if your project doesn't compile I recommend just using the downloaded version of the engine, and if you want to change things around a little feel free to alter it to your liking, the license on the engine is such that you can do whatever you want with it.
So let's run the engine (press F5 to build and run attached), and what we should get is two loaded entities, one is the root entity, and the other is a primitive cube in front of the camera.

And there we have it. Now lets reflect back on things a bit. We took an awfully long time to make a program that renders a cube, we could have done it in about 1/10th the time, with much less code. However, the goal wasn't really to make a cube rendering program, what we wanted was the start to a flexible game engine that is extensible and reusable. If you think about it we could very easily change the program to render a stack of cubes, so let's give that a shot. If you remember the place we're temporarily using to load entities into our scene is within the SceneManager, so open that up and look for LoadContent().
Add this at the bottom of the function (but within the temporary lines comments):
BaseEntity testCube2 = new BaseEntity(this, "Cube2");
testCube2.position = new Vector3(0, -1.01f, -10);

RenderComponent rendComp2 = new RenderComponent(testCube2, GeometricPrimitiveType.Cube);

AddEntityToScene(testCube2);

BaseEntity testCube3 = new BaseEntity(this, "Cube3");
testCube3.position = new Vector3(0, 1.01f, -10);

RenderComponent rendComp3 = new RenderComponent(testCube3, GeometricPrimitiveType.Cube);

AddEntityToScene(testCube3);
And now we see this:

After some new additions to the engine it'll be able to do a lot more than this. From here on I won't be going into as much detail about setting everything up line by line, I will publish new versions of the engine that you can download, and I will go into some detail about new functionality. The biggest reason for this is because it takes a lot longer to blog about making an engine than it does to actually make it. I made this entire engine as you see it now in 7 hours, and it took about 15 hours to blog about it. The idea behind this project is that I will create a simple but extensive framework from which I will be able to create demos and samples that I can post on my blog, and the posted sample and code will relate to each other without me having to describe the entire engine to the use. For example if I want to create a spline cinematic camera demo, and I did it from scratch, there would be a ton of code in there that most people do not care about, now the engine can take place of that code and sit hidden from view so people can concentrate on the math and features behind such a camera system.
I will keep you guys posted on new versions of the engine, as well as posting samples that use the engine. Thanks for reading!
Let's Make a Game Engine for XNA 4.0r, Part 4, RenderComponent and CameraComponent
In Part 3 of this series we covered BaseEntity and BaseComponent. Entities and Components are really at the heart of gameplay in any object/entity and component-based game engine, for example, in LEGO Universe we had over 110 different types of components, including a scripting component that allowed scripts to do all kinds of custom gameplay. In this post (Part 4) we will create our first two components, RenderComponent, and CameraComponent, and to start with we'll keep them extremely simple. Remember, our first milestone goal is just to render a cube on the screen with the engine.
RenderComponent
Ok, let's start with RenderComponent. First, make sure you derive RenderComponent from BaseComponent:
And the only two objects this class holds for now is a RenderDescription (which we'll get to see in Part 5), and a Matrix that defines the scale of the render mesh (although we won't implement scale until after the first milestone):
Next you'll see that derived components, like derived managers, must handle GetName():
RenderComponent will start out with two constructors, one in which the user can create a render component based on the name of an asset in the content pipeline, and another in which the user can create a render component based on a geometric primitive:
You can see based on which constructor is called we use a function called LoadModel() and pass in the name of the model, or another called LoadPrimitive() and pass in the type of primitive, here are those methods:
In our Update() method we make sure our render mesh's worldTransform is updated just in case the position or rotation of the entity changed. Please note that this is not the most efficient way to do this, what would be more efficient is to have components that care about changes to position or rotation listen for those changes, and when a change occurs then update the worldTransform. Maybe I'll do this in a later version of the engine. The worldTransform is a matrix that holds the scale, rotation, and translation (position) of a mesh. This is needed by the shaders to properly render the mesh:
And finally is our Draw method. Draw is called by XNA's base Game class, and we pass it through to the RenderManager, which calls Draw on all entities to request all of the RenderDescriptions they may have. Having already seen RenderManager in a previous section I won't explain what it does with those RenderDescriptions. But RenderDescriptions are covered in Part 5.
And that's it for RenderComponent. Here's the entire file:
CameraComponent
Next up we have CameraComponent, which at this time does virtually nothing special. You see, to render a basic camera we need position, rotation, and aspect ratio. Position and rotation are part of all entities, existing within BaseEntity, so for now that just leaves aspect ratio as the only thing we need the camera component for. But later on it will do more advanced things.
Rather than go over each part of such a simple class, I will post the entire file here. The only thing worth noting is that is has an aspectRatio variable which is initializes to be based on the dimensions of the viewport/window.
And that's it for Part 4. In Part 5 we're going to cover everything that remains for the first milestone for this engine, after which point you should be at the same point as if you had downloaded the engine yourself.
RenderComponent
Ok, let's start with RenderComponent. First, make sure you derive RenderComponent from BaseComponent:
public class RenderComponent : BaseComponent
And the only two objects this class holds for now is a RenderDescription (which we'll get to see in Part 5), and a Matrix that defines the scale of the render mesh (although we won't implement scale until after the first milestone):
private RenderDescription description;
private Matrix scaleMatrix = Matrix.Identity;
Notice we don't have accessors for these. The only time you want an accessor in a component is for data you want other users to be able to access or alter from outside the component. But if we make a script component giving access to these variables is as easy as making an accessor or function.
Next you'll see that derived components, like derived managers, must handle GetName():
protected override String GetName()
{
    return "Render";
}
RenderComponent will start out with two constructors, one in which the user can create a render component based on the name of an asset in the content pipeline, and another in which the user can create a render component based on a geometric primitive:
public RenderComponent(BaseEntity ParentEntity, String ModelName) :
    base(ParentEntity)
{
    Initialize();

    LoadModel(ModelName);
}

public RenderComponent(BaseEntity ParentEntity, GeometricPrimitiveType primitiveType) :
    base(ParentEntity)
{
    Initialize();

    LoadPrimitive(primitiveType);
}
Notice the component pass the 'ParentEntity' reference to the base class, which is BaseComponent. BaseComponent stores that reference, and when the derived component calls base.Initilize(), within its own Initialize() method, then BaseComponent attaches the component to the Entity. You can see based on which constructor is called we use a function called LoadModel() and pass in the name of the model, or another called LoadPrimitive() and pass in the type of primitive, here are those methods:
private void LoadModel(String modelName)
{
    description.model = this.Parent.Manager.Content.Load<model>(modelName);
}

private void LoadPrimitive(GeometricPrimitiveType primitiveType)
{
    switch (primitiveType)
    {
        case GeometricPrimitiveType.Cube:
            description.geoPrim = new CubePrimitive(this.Parent.Manager.Game.GraphicsDevice);
            break;
        case GeometricPrimitiveType.Sphere:
            description.geoPrim = new SpherePrimitive(this.Parent.Manager.Game.GraphicsDevice);
            break;
        case GeometricPrimitiveType.Cylinder:
            description.geoPrim = new CylinderPrimitive(this.Parent.Manager.Game.GraphicsDevice);
            break;
        case GeometricPrimitiveType.Torus:
            description.geoPrim = new TorusPrimitive(this.Parent.Manager.Game.GraphicsDevice);
            break;
        case GeometricPrimitiveType.Teapot:
            description.geoPrim = new TeapotPrimitive(this.Parent.Manager.Game.GraphicsDevice);
            break;
        default:
            throw new Exception("LoadPrimitive does not handle this type of GeometricPrimitive. Was a new primitive type made and not handled here?");
    }
}
Within LoadModel we utilitize the ContentManager to load our asset based on its name. ContentManager can be access from a component by going through the Entity, then SceneManager. And within LoadPrimitive we use an enum of a primitive type to decide which primitive to load. I will go over the GeometricPrimitives briefly in Part 5, there will be no need to go into them in full detail, as I didn't write them, they are extracted from a Microsoft XNA Sample that you can use if you wish to learn about them.In our Update() method we make sure our render mesh's worldTransform is updated just in case the position or rotation of the entity changed. Please note that this is not the most efficient way to do this, what would be more efficient is to have components that care about changes to position or rotation listen for those changes, and when a change occurs then update the worldTransform. Maybe I'll do this in a later version of the engine. The worldTransform is a matrix that holds the scale, rotation, and translation (position) of a mesh. This is needed by the shaders to properly render the mesh:
public override void Update(GameTime gameTime)
{
    description.worldTransform = this.scaleMatrix * this.Parent.rotation * Matrix.CreateTranslation(this.Parent.position);
}
And finally is our Draw method. Draw is called by XNA's base Game class, and we pass it through to the RenderManager, which calls Draw on all entities to request all of the RenderDescriptions they may have. Having already seen RenderManager in a previous section I won't explain what it does with those RenderDescriptions. But RenderDescriptions are covered in Part 5.
public override void Draw(GameTime gameTime, ListrenderDescriptions) { // Could do frustum culling here if we wanted to be more efficient. // We could go a step further and gather the entities within sections of an octree that are // currently within the view frustum, then skip the frustum check here. renderDescriptions.Add(description); }
And that's it for RenderComponent. Here's the entire file:
using System;
using System.Collections.Generic;
using System.Text;

using Microsoft.Xna.Framework;
using Microsoft.Xna.Framework.Graphics;

using SimpleGameEngine.Entity;
using SimpleGameEngine.Render;
using SimpleGameEngine.GeometricPrimitives;

namespace SimpleGameEngine.Components
{
    public class RenderComponent : BaseComponent
    {
        private RenderDescription description;
        private Matrix scaleMatrix = Matrix.Identity;

        protected override String GetName()
        {
            return "Render";
        }

        public RenderComponent(BaseEntity ParentEntity, String ModelName) :
            base(ParentEntity)
        {
            Initialize();

            LoadModel(ModelName);
        }

        public RenderComponent(BaseEntity ParentEntity, GeometricPrimitiveType primitiveType) :
            base(ParentEntity)
        {
            Initialize();

            LoadPrimitive(primitiveType);
        }

        protected override void Initialize()
        {
            description = new RenderDescription();

            description.worldTransform = this.scaleMatrix * this.Parent.rotation * Matrix.CreateTranslation(this.Parent.position);

            base.Initialize();
        }

        private void LoadModel(String modelName)
        {
            description.model = this.Parent.Manager.Content.Load<Model>(modelName);
        }

        private void LoadPrimitive(GeometricPrimitiveType primitiveType)
        {
            switch (primitiveType)
            {
                case GeometricPrimitiveType.Cube:
                    description.geoPrim = new CubePrimitive(this.Parent.Manager.Game.GraphicsDevice);
                    break;
                case GeometricPrimitiveType.Sphere:
                    description.geoPrim = new SpherePrimitive(this.Parent.Manager.Game.GraphicsDevice);
                    break;
                case GeometricPrimitiveType.Cylinder:
                    description.geoPrim = new CylinderPrimitive(this.Parent.Manager.Game.GraphicsDevice);
                    break;
                case GeometricPrimitiveType.Torus:
                    description.geoPrim = new TorusPrimitive(this.Parent.Manager.Game.GraphicsDevice);
                    break;
                case GeometricPrimitiveType.Teapot:
                    description.geoPrim = new TeapotPrimitive(this.Parent.Manager.Game.GraphicsDevice);
                    break;
                default:
                    throw new Exception("LoadPrimitive does not handle this type of GeometricPrimitive. Was a new primitive type made and not handled here?");
            }
        }

        public override void Update(GameTime gameTime)
        {
            description.worldTransform = this.scaleMatrix * this.Parent.rotation * Matrix.CreateTranslation(this.Parent.position);
        }

        public override void Draw(GameTime gameTime, List<RenderDescription> renderDescriptions)
        {
            // Could do frustum culling here if we wanted to be more efficient.
                // We could go a step further and gather the entities within sections of an octree that are
                // currently within the view frustum, then skip the frustum check here.

            renderDescriptions.Add(description);
        }
    }
}
CameraComponent
Next up we have CameraComponent, which at this time does virtually nothing special. You see, to render a basic camera we need position, rotation, and aspect ratio. Position and rotation are part of all entities, existing within BaseEntity, so for now that just leaves aspect ratio as the only thing we need the camera component for. But later on it will do more advanced things.
Rather than go over each part of such a simple class, I will post the entire file here. The only thing worth noting is that is has an aspectRatio variable which is initializes to be based on the dimensions of the viewport/window.
using System;
using System.Collections.Generic;
using System.Text;

using Microsoft.Xna.Framework;
using Microsoft.Xna.Framework.Graphics;

using SimpleGameEngine.Entity;
using SimpleGameEngine.Render;

namespace SimpleGameEngine.Components
{
    public class CameraComponent : BaseComponent
    {
        private float aspectRatio;
        public float AspectRatio
        {
            get { return aspectRatio; }
        }

        protected override String GetName()
        {
            return "Camera";
        }

        public CameraComponent(BaseEntity ParentEntity) :
            base(ParentEntity)
        {
            Initialize();
        }

        protected override void Initialize()
        {
            // Default aspect ratio is that of the viewport/window
            aspectRatio = this.Parent.Manager.Game.GraphicsDevice.Viewport.AspectRatio;

            base.Initialize();
        }
    }
}
And that's it for Part 4. In Part 5 we're going to cover everything that remains for the first milestone for this engine, after which point you should be at the same point as if you had downloaded the engine yourself.
Let's Make a Game Engine for XNA 4.0r, Part 3, BaseEntity and BaseComponent

First you'll need to create two folders within the main project, named "Components", and "Entity". Within components create a file called "BaseComponent.cs", and within Entity create a file called "BaseEntity.cs". You're file structure should now look like this:
BaseEntity is not an abstract class, in fact, most entities will get their properties from their components, and the entity is just what ties those components together. BaseComponent however is abstract, all components must derived directly or indirectly from BaseComponent.
BaseEntity
Ok, let's start with BaseEntity. Since Entities belong to the SceneManager we allow BaseEntity to keep a reference to the SceneManager, which also gives it access to the MainGame through the SceneManager. Also, just like Managers, Entities has names. The difference with Entities is that since the base class is not abstract, the name can be stored directly on the Entity rather than requiring a GetName() function.
private SceneManager manager;
public SceneManager Manager
{
    get { return manager; }
}

private String name;
public String Name
{
    get { return name; }
}
Entities hold a Dictionary of components based on their names, just like MainGame holds a list of Managers based on names, and SceneManager holds a list of Entities based on their names. And like the SceneManager, Entity also has Add/Remove/Get methods to add and get components by their names.
private Dictionary<String, BaseComponent> components;

public void AddComponent(BaseComponent component)
{
    BaseComponent checkComponent = null;
    if (components.TryGetValue(component.Name, out checkComponent))
    {
         throw new Exception("Component type " + component.Name + " already exists on this object: " + name);
    }

    components.Add(component.Name, component);
}

public void RemoveComponent(BaseComponent component)
{
    BaseComponent checkComponent = null;
    if (!components.TryGetValue(component.Name, out checkComponent))
    {
        throw new Exception("Component type " + component.Name + " doesn't exists on this object: " + name);
    }

    components.Remove(component.Name);
}

public BaseComponent GetComponent(String componentName)
{
    BaseComponent component = null;
    if (!components.TryGetValue(componentName, out component))
    {
        // Component wasn't found
    }

    return component;
}
And the remaining functions serve only to pass Update and Draw calls to each component:
public void Update(GameTime gameTime)
{
    foreach (KeyValuePair<String, BaseComponent> pair in components)
    {
        (pair.Value).Update(gameTime);
    }
}

public void Draw(GameTime gameTime, List<RenderDescription> renderDescriptions)
{
    foreach ( KeyValuePair<String, BaseComponent> pair in components )
    {
        (pair.Value).Draw(gameTime, renderDescriptions);
    }
}
Here's the full BaseEntity file:
using System;
using System.Collections.Generic;
using System.Linq;
using System.Text;

using Microsoft.Xna.Framework;
using Microsoft.Xna.Framework.Graphics;

using SimpleGameEngine.Scene;
using SimpleGameEngine.Components;
using SimpleGameEngine.Render;

namespace SimpleGameEngine.Entity
{
    public class BaseEntity
    {
        private SceneManager manager;
        public SceneManager Manager
        {
            get { return manager; }
        }

        private String name;
        public String Name
        {
            get { return name; }
        }

        private Dictionary<string, basecomponent> components;

        // Public for performance reasons, accessors cause copies
        public Vector3 position = Vector3.Zero;
        public Matrix rotation = Matrix.Identity;

        public BaseEntity(SceneManager sceneManager, String EntityName)
        {
            this.components = new Dictionary<string, basecomponent>();

            this.manager = sceneManager;
            this.name = EntityName;
        }

        public void AddComponent(BaseComponent component)
        {
            BaseComponent checkComponent = null;
            if (components.TryGetValue(component.Name, out checkComponent))
            {
                throw new Exception("Component type " + component.Name + " already exists on this object: " + name);
            }

            components.Add(component.Name, component);
        }

        public void RemoveComponent(BaseComponent component)
        {
            BaseComponent checkComponent = null;
            if (!components.TryGetValue(component.Name, out checkComponent))
            {
                throw new Exception("Component type " + component.Name + " doesn't exists on this object: " + name);
            }

            components.Remove(component.Name);
        }

        public BaseComponent GetComponent(String componentName)
        {
            BaseComponent component = null;
            if (!components.TryGetValue(componentName, out component))
            {
                // Component wasn't found
            }

            return component;
        }

        public void Update(GameTime gameTime)
        {
            foreach (KeyValuePair<string, basecomponent> pair in components)
            {
                (pair.Value).Update(gameTime);
            }
        }

        public void Draw(GameTime gameTime, List renderDescriptions)
        {
            foreach ( KeyValuePair<string, basecomponent> pair in components )
            {
                (pair.Value).Draw(gameTime, renderDescriptions);
            }
        }
    }
}
BaseComponent
BaseComponent is a very small and simple class, for now at least. It just holds common properties that all components must derived from. BaseComponent holds the reference to the Entity that it is connected to, this lets all components communicate up to the Entity. The reference to the Entity is stored from within the constructor:
private BaseEntity parent;
public BaseEntity Parent
{
    get { return parent; }
}

public BaseComponent(BaseEntity parentEntity)
{
    this.parent = parentEntity;
}
By now you should be getting a feel for some common things in the engine, such as accessing systems by Strings, and Initialization methods registering systems with their owners. In the case of components they handle a GetName() function just like Managers and Entities, and they also have an Initialization function that registers the component with the Entity:
public String Name
{
    get { return this.GetName(); }
}

// Name of the component
protected abstract String GetName();

protected virtual void Initialize()
{
    this.parent.AddComponent(this);
}
And all we're left with is a declaration of a virtual Update and virtual Draw function, which allows components to receive either of these from the SceneManager:
public virtual void Update(GameTime gameTime) {}
public virtual void Draw(GameTime gameTime, List renderDescriptions) {}
Here's the entire file for 'BaseComponent.cs':
using System;
using System.Collections.Generic;
using System.Text;

using Microsoft.Xna.Framework;
using Microsoft.Xna.Framework.Graphics;

using SimpleGameEngine.Entity;
using SimpleGameEngine.Render;

namespace SimpleGameEngine.Components
{
    abstract public class BaseComponent
    {
        private BaseEntity parent;
        public BaseEntity Parent
        {
            get { return parent; }
        }

        public String Name
        {
            get { return this.GetName(); }
        }

        public BaseComponent(BaseEntity parentEntity)
        {
            this.parent = parentEntity;
        }

        // Name of the component
        protected abstract String GetName();

        protected virtual void Initialize()
        {
            this.parent.AddComponent(this);
        }

        public virtual void Update(GameTime gameTime) {}
        public virtual void Draw(GameTime gameTime, List<renderdescription> renderDescriptions) {}
    }
}
Up next in Part 4 is the RenderComponent and CameraComponent.
Thursday, November 17, 2011
Let's Make a Game Engine for XNA 4.0r, Part 2, SceneManager and MainGame
The last post (Part 1 of this series) was about creating a BaseManager and RenderManager class. If you remember, when the RenderManager renders the scene it needs to get the list of entities to render, and those entities belong the the SceneManager. In order to get to the SceneManager we'll need to go through the MainGame class.
MainGame
So let's begin with the MainGame class (Main.cs). For now there are only two objects in this class, the GraphicsDeviceManager and the list of Managers. The list of Managers is the list that includes SceneManager, RenderManager, and others we will need in the future. The way a scripter or programmer will access the Managers is by name, which is a String, so our list of Managers will be a Dictionary with Strings as the key, and the Manager itself as the value. So let's create those objects and accessors for them:
Next we'll create a constructor:
We have to initialize the GraphicsDeviceManager here, before our parent class (Microsoft.Xna.Framework.Game) calls Initialize(). We have to call base.Initialize() within our handler of Initialize() (code below), otherwise we'll never get a call to LoadContent(), however, if we do not have a GraphicsDeviceManager we'll also never get a call to LoadContent().
Here's the order that XNA's base Game class calls things (or at least the part we care about for now):
Constructor, Initialize, LoadContent (if base.Initialize is called on the base class, and only if a GraphicsDeviceManager is loaded), Update, Draw, Update, Draw, etc...., UnloadContent (as game is closed down).
Anyway, here's the handler to the virtual Initialize method:
You can see we create the two Managers that we need. Notice we're passing them the reference to this MainGame instance. If you remember from the RenderManager class, it will take that reference, and during RenderManager's Initialize method it calls to BaseManager's Initialize method which registers that manager with MainGame. So it only takes a single line here to create a Manager instance and have it register with the MainGame. In order for BaseManager to register with MainGame, it needs a method within MainGame that allows it to do so. We'll call that method 'AddManager', and here it is:
The reason we add managers to a Dictionary is so that we can access them by name later on, so we'll need a method that lets us do that:
And the rest of our methods are called from the base Game class and we simply pass them on to all registered Managers:
And here is the full file:
SceneManager
That leaves us with the SceneManager class. The SceneManager is in charge or running the scene, and all of the entities that exist within it. For now the SceneManager only has one object it is in charge of, and that is the list of entities. Just like with the Managers list in MainGame, the entity list is also a Dictionary with Strings as the key, and the entity as the value. Every entity has a name, and that is how they're located...just like the Managers. So let's start with our one object, its accessor, and an accessor to the ContentManager (which is not a class we've created, it's part of XNA's Game class):
Also, just like RenderManager, SceneManager needs to handle the abstract GetName() method declared by BaseManager, this allows BaseManager to register SceneManager by its name with MainGame:
And we'll need our constructor and Initialize methods, just like RenderManager, except in the case of SceneManager we need to create the instance of the Dictionary for the entities:
The LoadContent function is where we load up the Root entity for the engine. There should always be one entity in a Scene otherwise you'll have no entity to act as a camera. So we will create an entity, and give it a CameraComponent, and then add it to the scene. You'll get to see the functionality behind most of this in Part 3 of this series:
Just like with the MainGame class and how it adds Managers and allows users to retrieve them by name, SceneManager does the same thing with Entities:
And that's it for the SceneManager, here's the full file:
In Part 3 we will go over BaseEntity, and BaseComponent.
MainGame
So let's begin with the MainGame class (Main.cs). For now there are only two objects in this class, the GraphicsDeviceManager and the list of Managers. The list of Managers is the list that includes SceneManager, RenderManager, and others we will need in the future. The way a scripter or programmer will access the Managers is by name, which is a String, so our list of Managers will be a Dictionary with Strings as the key, and the Manager itself as the value. So let's create those objects and accessors for them:
private GraphicsDeviceManager graphics;
public GraphicsDeviceManager Graphics
{
    get { return this.graphics; }
    set { this.graphics = value; }
}

private Dictionary<String, BaseManager> managers;
public Dictionary<String, BaseManager> Managers
{
    get { return this.managers; }
}
Next we'll create a constructor:
public MainGame()
{
    this.graphics = new GraphicsDeviceManager(this);
    this.Content.RootDirectory = "Content";

    this.managers = new Dictionary<string, BaseManager>();
}
We have to initialize the GraphicsDeviceManager here, before our parent class (Microsoft.Xna.Framework.Game) calls Initialize(). We have to call base.Initialize() within our handler of Initialize() (code below), otherwise we'll never get a call to LoadContent(), however, if we do not have a GraphicsDeviceManager we'll also never get a call to LoadContent().
Here's the order that XNA's base Game class calls things (or at least the part we care about for now):
Constructor, Initialize, LoadContent (if base.Initialize is called on the base class, and only if a GraphicsDeviceManager is loaded), Update, Draw, Update, Draw, etc...., UnloadContent (as game is closed down).
Anyway, here's the handler to the virtual Initialize method:
protected override void Initialize()
{
    SceneManager sceneManager = new SceneManager(this);
    RenderManager renderManager = new RenderManager(this);

    base.Initialize();
}
You can see we create the two Managers that we need. Notice we're passing them the reference to this MainGame instance. If you remember from the RenderManager class, it will take that reference, and during RenderManager's Initialize method it calls to BaseManager's Initialize method which registers that manager with MainGame. So it only takes a single line here to create a Manager instance and have it register with the MainGame. In order for BaseManager to register with MainGame, it needs a method within MainGame that allows it to do so. We'll call that method 'AddManager', and here it is:
public void AddManager(BaseManager manager)
{
    BaseManager checkManager = null;
    if (managers.TryGetValue(manager.Name, out checkManager))
    {
        throw new Exception("Manager type " + manager.Name + " already exists within the game engine");
    }

    managers.Add(manager.Name, manager);
}
We do a check to see if a Manager by the same name has already been registered with MainGame. This shouldn't happen, but better safe than sorry. Efficiency shouldn't be a problem here anyway, this method is only called a few times each time your game runs. The methods you really look at for optimization should be called either many times per frame, or are very time consuming methods.The reason we add managers to a Dictionary is so that we can access them by name later on, so we'll need a method that lets us do that:
public BaseManager GetManager(String managerName)
{
    BaseManager manager = null;
    if (!managers.TryGetValue(managerName, out manager))
    {
        // Manager wasn't found
    }

    return manager;
}
And the rest of our methods are called from the base Game class and we simply pass them on to all registered Managers:
protected override void LoadContent()
{
    foreach (KeyValuePair<String, BaseManager> pair in managers)
    {
        (pair.Value).LoadContent();
    }
}

protected override void UnloadContent()
{
    foreach (KeyValuePair<String, BaseManager> pair in managers)
    {
        (pair.Value).UnloadContent();
    }
}

protected override void Update(GameTime gameTime)
{
    foreach (KeyValuePair<String, BaseManager> pair in managers)
    {
        (pair.Value).Update(gameTime);
    }
}

protected override void Draw(GameTime gameTime)
{
    foreach (KeyValuePair<String, BaseManager> pair in managers)
    {
        (pair.Value).Draw(gameTime);
    }

    base.Draw(gameTime);
}
You must register all Managers during MainGame's Initialize, because otherwise you will never get the call to LoadContent, because as you can see if only sends it to Managers that are registered.And here is the full file:
using System;
using System.Collections.Generic;
using System.Linq;
using Microsoft.Xna.Framework;
using Microsoft.Xna.Framework.Audio;
using Microsoft.Xna.Framework.Content;
using Microsoft.Xna.Framework.GamerServices;
using Microsoft.Xna.Framework.Graphics;
using Microsoft.Xna.Framework.Input;
using Microsoft.Xna.Framework.Media;

using SimpleGameEngine.Scene;
using SimpleGameEngine.Render;

namespace SimpleGameEngine
{
    ///
    /// This is the main type for your game
    ///
    public class MainGame : Microsoft.Xna.Framework.Game
    {
        private GraphicsDeviceManager graphics;
        public GraphicsDeviceManager Graphics
        {
            get { return this.graphics; }
            set { this.graphics = value; }
        }

        private Dictionary<String, BaseManager> managers;
        public Dictionary<String, BaseManager> Managers
        {
            get { return this.managers; }
        }

        public MainGame()
        {
            this.graphics = new GraphicsDeviceManager(this);
            this.Content.RootDirectory = "Content";

            this.managers = new Dictionary<string, BaseManager>();
        }

        protected override void Initialize()
        {
            SceneManager sceneManager = new SceneManager(this);
            RenderManager renderManager = new RenderManager(this);

            base.Initialize();
        }

        public void AddManager(BaseManager manager)
        {
            BaseManager checkManager = null;
            if (managers.TryGetValue(manager.Name, out checkManager))
            {
                throw new Exception("Manager type " + manager.Name + " already exists within the game engine");
            }

            managers.Add(manager.Name, manager);
        }

        public BaseManager GetManager(String managerName)
        {
            BaseManager manager = null;
            if (!managers.TryGetValue(managerName, out manager))
            {
                // Manager wasn't found
            }

            return manager;
        }

        protected override void LoadContent()
        {
            foreach (KeyValuePair<String, BaseManager> pair in managers)
            {
                (pair.Value).LoadContent();
            }
        }

        protected override void UnloadContent()
        {
            foreach (KeyValuePair<String, BaseManager> pair in managers)
            {
                (pair.Value).UnloadContent();
            }
        }

        protected override void Update(GameTime gameTime)
        {
            foreach (KeyValuePair<String, BaseManager> pair in managers)
            {
                (pair.Value).Update(gameTime);
            }
        }

        protected override void Draw(GameTime gameTime)
        {
            foreach (KeyValuePair<String, BaseManager> pair in managers)
            {
                (pair.Value).Draw(gameTime);
            }

            base.Draw(gameTime);
        }
    }
}
SceneManager
That leaves us with the SceneManager class. The SceneManager is in charge or running the scene, and all of the entities that exist within it. For now the SceneManager only has one object it is in charge of, and that is the list of entities. Just like with the Managers list in MainGame, the entity list is also a Dictionary with Strings as the key, and the entity as the value. Every entity has a name, and that is how they're located...just like the Managers. So let's start with our one object, its accessor, and an accessor to the ContentManager (which is not a class we've created, it's part of XNA's Game class):
private Dictionary<String, BaseEntity> entities;
public Dictionary<String, BaseEntity> Entities
{
    get { return entities; }
}

public ContentManager Content
{
    get { return Game.Content; }
}
Also, just like RenderManager, SceneManager needs to handle the abstract GetName() method declared by BaseManager, this allows BaseManager to register SceneManager by its name with MainGame:
protected override String GetName()
{
    return "Scene";
}
And we'll need our constructor and Initialize methods, just like RenderManager, except in the case of SceneManager we need to create the instance of the Dictionary for the entities:
public SceneManager(MainGame Game)
            : base(Game)
{
    this.entities = new Dictionary();

    Initialize();
}

protected override void Initialize()
{
    base.Initialize();
}
The LoadContent function is where we load up the Root entity for the engine. There should always be one entity in a Scene otherwise you'll have no entity to act as a camera. So we will create an entity, and give it a CameraComponent, and then add it to the scene. You'll get to see the functionality behind most of this in Part 3 of this series:
public override void LoadContent()
{
    // We always have at least one entity in the world. We'll create that now and then
    // make it our main camera for the game.
    BaseEntity entity = new BaseEntity(this, EngineCommon.RootEntityName);

    // The component will automatically attach to the entity that we pass into it
    CameraComponent camComp = new CameraComponent(entity);

    // Now we add the entity to the scene
    AddEntityToScene(entity);

    // ===================================================================================
    // TEMPORARY!!!!!!!!!!!!!!!!!!!!!!!!!!
    BaseEntity testCube = new BaseEntity(this, "Cube");
    testCube.position = new Vector3(0, 0, -10);

    RenderComponent rendComp = new RenderComponent(testCube, GeometricPrimitiveType.Cube);

    AddEntityToScene(testCube);
    // ===================================================================================
}
There's a lot going on here, lets run down exactly what is happening.- We create a BaseEntity, and pass it a reference to this SceneManager, and we also pass it a String for its name. In this case it's the root entity for the game so we give it the default root entity name. NOTE: BaseEntities do not automatically register with the SceneManager, this is because they're not complete until they have all of their components loaded onto them, and if we decide to make this engine multi-threaded then adding it to the list before it has components could cause it to be run without components.
- We create a CameraComponent, and pass it a reference to the BaseEntity that it belongs to. All components will automatically attach the a BaseEntity. We'll see later that Component are just like many other classes, during their initialization they ball BaseComponent which registers them with an Entity.
- And now that our BaseEntity has all of the components it needs we can add it to the scene by calling AddEntityToScene (which we'll see soon in code below).
- Notice the large comment that says "TEMPORARY" here. This code is only here during this milestone, as a way to easily load up a cube so we can see that we're successfully rendering something.
- We create the cube, naming it "Cube", and we update its position to be at (0, 0, -10). Because our camera we loaded is using its default rotation (Matrix::Identity), and means its facing directly down the -Z axis, so putting the cube here should put it 10 units in front of the camera.
- We create a RenderComponent (which we'll see in Part 3 or 4), and assign it to our BaseEntity, and we create it with a GeometricPrimitiveType of Cube (we'll see this in part 3 or 4 as well).
- And now that the entity is ready with its component we add it to the scene.
Whew...now that we're done with that let's continue. All Managers can handle the Update method, which is called each frame by MainGame, so we'll handle it, and pass the Update to all entities (and eventually only entities that need updates each frame):
public override void Update(GameTime gameTime)
{
    foreach (KeyValuePair<string, baseentity&rt; pair in entities)
    {
        (pair.Value).Update(gameTime);
    }
}
Just like with the MainGame class and how it adds Managers and allows users to retrieve them by name, SceneManager does the same thing with Entities:
public void AddEntityToScene(BaseEntity entity)
{
    BaseEntity checkEntity = null;
    if (entities.TryGetValue(entity.Name, out checkEntity))
    {
        throw new Exception("An entity named " + entity.Name + " already exists.");
    }

    entities.Add(entity.Name, entity);
}

public void RemoveEntityFromScene(BaseEntity entity)
{
    BaseEntity checkEntity = null;
    if (!entities.TryGetValue(entity.Name, out checkEntity))
    {
        throw new Exception("No entity named " + entity.Name + " exist in the scene to be removed.");
    }

    entities.Remove(entity.Name);
}

public BaseEntity GetEntity(String entityName)
{
    BaseEntity entity = null;
    if (!entities.TryGetValue(entityName, out entity))
    {
        // Entity wasn't found
    }

    return entity;
}
And you can see we've added a RemoveEntityFromScene method. We aren't using it yet, but it will remove the entity from the scene, but not delete the entity. If we were to multithread this engine (and maybe we will) and we wanted to add/remove component from it after it was loaded, we would make sure to lock the entity list, then remove the entity from the list, unlock the list, lock the entity, add/remove the necessary components, unlock the entity, lock the entity list, readd the entity to the list, unlock the list. Yea...fun stuff. Long story short we would need a method to remove the entity while it was having its components altered, or some other way to lock it, removing it might not be ideal because it could blip out of view.And that's it for the SceneManager, here's the full file:
using System;
using System.Collections.Generic;
using System.Text;

using Microsoft.Xna.Framework;
using Microsoft.Xna.Framework.Content;
using Microsoft.Xna.Framework.Graphics;

using SimpleGameEngine.Entity;
using SimpleGameEngine.Components;
using SimpleGameEngine.GeometricPrimitives;

namespace SimpleGameEngine.Scene
{
    public class SceneManager : BaseManager
    {
        private Dictionary<String, BaseEntity> entities;
        public Dictionary<String, BaseEntity> Entities
        {
            get { return entities; }
        }

        public ContentManager Content
        {
            get { return Game.Content; }
        }

        protected override String GetName()
        {
            return "Scene";
        }

        public SceneManager(MainGame Game)
            : base(Game)
        {
            this.entities = new Dictionary<string, BaseEntity>();

            Initialize();
        }

        protected override void Initialize()
        {
            base.Initialize();
        }

        public override void LoadContent()
        {
            // We always have at least one entity in the world. We'll create that now and then
            // make it our main camera for the game.
            BaseEntity entity = new BaseEntity(this, EngineCommon.RootEntityName);

            // The component will automatically attach to the entity that we pass into it
            CameraComponent camComp = new CameraComponent(entity);

            // Now we add the entity to the scene
            AddEntityToScene(entity);

            // ===================================================================================
            // TEMPORARY!!!!!!!!!!!!!!!!!!!!!!!!!!
            BaseEntity testCube = new BaseEntity(this, "Cube");
            testCube.position = new Vector3(0, 0, -10);

            RenderComponent rendComp = new RenderComponent(testCube, GeometricPrimitiveType.Cube);

            AddEntityToScene(testCube);
            // ===================================================================================
        }

        public override void Update(GameTime gameTime)
        {
            foreach (KeyValuePair<String, BaseEntity> pair in entities)
            {
                (pair.Value).Update(gameTime);
            }
        }

        public void AddEntityToScene(BaseEntity entity)
        {
            BaseEntity checkEntity = null;
            if (entities.TryGetValue(entity.Name, out checkEntity))
            {
                throw new Exception("An entity named " + entity.Name + " already exists.");
            }

            entities.Add(entity.Name, entity);
        }

        public void RemoveEntityFromScene(BaseEntity entity)
        {
            BaseEntity checkEntity = null;
            if (!entities.TryGetValue(entity.Name, out checkEntity))
            {
                throw new Exception("No entity named " + entity.Name + " exist in the scene to be removed.");
            }

            entities.Remove(entity.Name);
        }

        public BaseEntity GetEntity(String entityName)
        {
            BaseEntity entity = null;
            if (!entities.TryGetValue(entityName, out entity))
            {
                // Entity wasn't found
            }

            return entity;
        }
    }
}
In Part 3 we will go over BaseEntity, and BaseComponent.
Wednesday, November 16, 2011
Let's Make a Game Engine for XNA 4.0r, Prologue
I was in the middle of making a simple game engine framework so I could start writing blog posts about things like creating camera, input systems, terrain systems, spatial partitioning, etc., when I realized that I should document the actual creation of the framework.
I chose XNA for a few reasons:
1.) I'm already familiar with it after having developed a game engine for it: http://quickstartengine.codeplex.com/
2.) It's fast for prototyping
3.) It handles the back-end for a lot of mundane things like creating a Window, handling Windows messaging, handling DirectX. All of that means less I have to explain here on my blog, and that lets us get to the interesting parts more quickly.
You'll need some familiarity with Visual Studio 2010:
XNA 4.0r runs only in Visual Studio 2010. Luckily it works in the free version of VS2010 C# Express, which you can get here: http://www.microsoft.com/visualstudio/en-us/products/2010-editions/visual-csharp-express
The upcoming blog posts assume you know C#:
XNA runs within C#. If you do not know C# then you may want to stop now and spend a couple of days getting a basic rundown of C#. When I first started with XNA I knew only C++, I picked up enough about C# in about 8 hours to start making simple games in XNA. If you know C++ or Java fairly well then you can probably pick up the basics of C# pretty quickly.
If you're not familiar with XNA:
I would recommend at least spending a few hours looking a few simple tutorials to learn about some of the main functionality, how to create a project, and how the content pipeline works.
These links should cover just enough for you to grasp what you'll need to make this game engine.:
http://www.xnadevelopment.com/tutorials/gettingstartedwithxnadevelopment/GettingStartedWithXNADevelopment.shtml
http://www.xnadevelopment.com/tutorials/creatinganewxnagameproject/CreatingANewXNAWindowsGameProject.shtml
http://www.xnadevelopment.com/tutorials/addinganimagetothegameproject/AddingAnImageToTheGameProject.shtml
Ok, if you made it this far you are reasonably familiar with Visual Studio 2010 Express, C# and XNA 4.0r. Now we can continue on to Part 1 of this series.
I chose XNA for a few reasons:
1.) I'm already familiar with it after having developed a game engine for it: http://quickstartengine.codeplex.com/
2.) It's fast for prototyping
3.) It handles the back-end for a lot of mundane things like creating a Window, handling Windows messaging, handling DirectX. All of that means less I have to explain here on my blog, and that lets us get to the interesting parts more quickly.
You'll need some familiarity with Visual Studio 2010:
XNA 4.0r runs only in Visual Studio 2010. Luckily it works in the free version of VS2010 C# Express, which you can get here: http://www.microsoft.com/visualstudio/en-us/products/2010-editions/visual-csharp-express
The upcoming blog posts assume you know C#:
XNA runs within C#. If you do not know C# then you may want to stop now and spend a couple of days getting a basic rundown of C#. When I first started with XNA I knew only C++, I picked up enough about C# in about 8 hours to start making simple games in XNA. If you know C++ or Java fairly well then you can probably pick up the basics of C# pretty quickly.
If you're not familiar with XNA:
I would recommend at least spending a few hours looking a few simple tutorials to learn about some of the main functionality, how to create a project, and how the content pipeline works.
These links should cover just enough for you to grasp what you'll need to make this game engine.:
http://www.xnadevelopment.com/tutorials/gettingstartedwithxnadevelopment/GettingStartedWithXNADevelopment.shtml
http://www.xnadevelopment.com/tutorials/creatinganewxnagameproject/CreatingANewXNAWindowsGameProject.shtml
http://www.xnadevelopment.com/tutorials/addinganimagetothegameproject/AddingAnImageToTheGameProject.shtml
Ok, if you made it this far you are reasonably familiar with Visual Studio 2010 Express, C# and XNA 4.0r. Now we can continue on to Part 1 of this series.
Let's Make a Game Engine for XNA 4.0r, Part 1, BaseManager and RenderManager
Getting even a simple game engine running is no small task, but once you've created one you'll start to have a grasp over all of the different techniques and systems that come together to make one. Our first milestone (version 0.1) will be to create a couple of simple hierarchies of Main Game Interface -> System Managers, and Entity -> Components, create methods of easily communicating between all systems, and to create a simple primitive shape and render it on the screen.
There's two ways that I recommend that you continue:
1.) Download version 0.1, and have it open side by side with your own project, and write it yourself as you follow along on this blog.
2.) Download version 0.1, and have it open and use it as a reference as you follow along on this blog.
Method #1 is probably more thorough, and as you type through everything you're probably more likely to grasp the engine architecture and be familiar with it.
Method #2 will save you a lot of time but you may have to glance through things a few times before you're comfortable with it.
Whichever way you choose I recommend downloading the project, because I won't be explaining every single line of code on the blog, only the parts worth mentioning.
Alright, lets begin, at the beginning, of course.
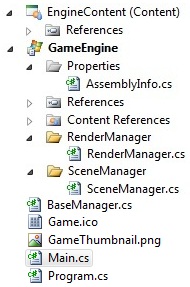 Create a Windows XNA project (this engine may or may not work for the Xbox 360 as well, I do not currently have a subscription to test it). I named mine 'SimpleGameEngine'. I then changed the name of the main project to 'GameEngine', and the name of the content project 'EngineContent'. Name yours whatever you would like, but I will refer to them from here on by these names. Additionally I named my Xna.Game class MainGame and changed the name of the file to Main.cs.
The first thing we're going to focus on is the SceneManager and RenderManager classes, and the class that all Managers derive from, BaseManager. Create a class named 'BaseManager.cs' and place it directly within the GameEngine project. Create 'SceneManager' and 'RenderManager' folders. After making those folders, within the 'SceneManager' folder add a new class called 'SceneManager.cs', and within the 'RenderManager' folder add a new class called 'RenderManager.c's. After doing so my folder structure looked something like this:
BaseManager
Ok let's start with the BaseManager class. This is a simple abstract class that contains a couple things that all Manager classes must have, like a name and reference to the MainGame, and some common virtual functions.
Here's the variable and accessors for BaseManager.
Here's the definition for the 'GetName' function:
Alright let's get the constructor made. At the very least we'll need the reference to MainGame given to use when the Manager is created, so that's the only variable needed for this base class:
All derived Manager classes will call Initialize upon being constructed, this give the base class a change to register this Manager class with the MainGame.
And the rest of the class is just virtual methods that are defined to be passed to derived classes:
Here's the code for the entire BaseManager class:
RenderManager
The first thing we'll do is make RenderManager derive from BaseManager:
Now, we need to handle the abstract method 'GetName' from the base class. If we ever want to look for the RenderManager in our engine we'll be able to do it by name, that is what this function with help with. We want the user to be able to look for it by the name "Render". So our function is this:
Ok we still need to create a constructor for this class. Because the BaseManager requires a MainGame, we need it as well so we can pass it through. And in the case of this class it's all we'll need:
Because the RenderManager is manager of all things rendering I put an accessor here to the Xna.Game class' GraphicsDeviceManager and Graphics Device:
I also moved the SpriteBatch instance out of MainGame
The render manager has a single BasicEffect that is used for rendering (at least at this point in time). So we'll create the variable for it, and a function to load the effect:
Try and keep your variables at the top/bottom of your code, and your functions on the other side. Don't mix them. The samples I'm posting just show the relationship between them, it doesn't imply they'll go next to each other in the final product.
We'll also want a String variable to hold the name of the currently rendering camera.
'EngineCommon' and 'RootEntityName' are defined in another file we'll get to soon. Don't expect your code to compile until we reach the first milestone.
LoadContent is called on all Managers when the MainGame begins its LoadContent phase. We'll want to handle that function to load up our BasicEffect and SpriteBatch:
And finally we're left with the Draw function. Pay close attention to this part because it involves some engine architecture discussion.

So back to the Draw() function. What we want to do during the draw phase is get all entities in the scene, grab their render descriptions, and grab the camera, and use the camera's properties to render with. So how do we get all the information from within the RenderManager? The arrows in the above image represent the areas we need to go. As we just said above, the SceneManager holds all entities, so we need to get the entities from there, and the CameraComponent on the current rendering camera will have camera-specific information we need.
As we'll see later, the MainGame class lets us access any Manager class by its name, which in the case of the SceneManager is "scene". Once we have access to the SceneManager it in turn has a method to let us access all an entity by name. We use the camera's name (which we'll learn about later) to find the entity that is currently serving as the camera. SceneManager also has the functionality to let us grab all entities in the scene, so we grab that list as well.
And now based on all of that, we can render the scene:
You can see here we get the scene manager and store it (and make sure it's valid). We grab the camera entity as well, and then specifically grab its camera component because that has the aspect ratio information we'll need.
We then create a list of render descriptions and then call Draw() on all entities, passing the list to each entity. As we'll see later entities that have render components simply add to that list their own model or primitive.
One we have the list of render descriptions we simply go through each one in the list and render the model or the primitive.
Here's the code for the entire RenderManager:
In part 2, we go over the SceneManager and MainGame classes.
There's two ways that I recommend that you continue:
1.) Download version 0.1, and have it open side by side with your own project, and write it yourself as you follow along on this blog.
2.) Download version 0.1, and have it open and use it as a reference as you follow along on this blog.
Method #1 is probably more thorough, and as you type through everything you're probably more likely to grasp the engine architecture and be familiar with it.
Method #2 will save you a lot of time but you may have to glance through things a few times before you're comfortable with it.
Whichever way you choose I recommend downloading the project, because I won't be explaining every single line of code on the blog, only the parts worth mentioning.
Alright, lets begin, at the beginning, of course.
Create a Windows XNA project (this engine may or may not work for the Xbox 360 as well, I do not currently have a subscription to test it). I named mine 'SimpleGameEngine'. I then changed the name of the main project to 'GameEngine', and the name of the content project 'EngineContent'. Name yours whatever you would like, but I will refer to them from here on by these names. Additionally I named my Xna.Game class MainGame and changed the name of the file to Main.cs.The first thing we're going to focus on is the SceneManager and RenderManager classes, and the class that all Managers derive from, BaseManager. Create a class named 'BaseManager.cs' and place it directly within the GameEngine project. Create 'SceneManager' and 'RenderManager' folders. After making those folders, within the 'SceneManager' folder add a new class called 'SceneManager.cs', and within the 'RenderManager' folder add a new class called 'RenderManager.c's. After doing so my folder structure looked something like this:
Ok let's start with the BaseManager class. This is a simple abstract class that contains a couple things that all Manager classes must have, like a name and reference to the MainGame, and some common virtual functions.
Here's the variable and accessors for BaseManager.
private MainGame game;
public MainGame Game
{
    get { return this.game; }
}

public String Name
{
    get { return this.GetName(); }
}
Notice the accessor for 'name' calls a virtual function 'GetName()'. This is because the name of the manager is determined by the derived class, not this base class.Here's the definition for the 'GetName' function:
// Name of the manager
protected abstract String GetName();
This is an abstract function so all derived classes must handle it.
Alright let's get the constructor made. At the very least we'll need the reference to MainGame given to use when the Manager is created, so that's the only variable needed for this base class:
public BaseManager(MainGame game)
{
     this.game = game;
}
All derived Manager classes will call Initialize upon being constructed, this give the base class a change to register this Manager class with the MainGame.
protected virtual void Initialize()
{
    this.game.AddManager(this);
}
We make this protected so it cannot be called outside of a derived Manager class, and we make it virtual so that when it's called by the derived class it gives that class a chance to handle Initialization before calling the BaseManager.And the rest of the class is just virtual methods that are defined to be passed to derived classes:
public virtual void LoadContent() {}
public virtual void UnloadContent() {}
public virtual void Update(GameTime gameTime) {}
public virtual void Draw(GameTime gameTime) {}
Here's the code for the entire BaseManager class:
using System;
using System.Collections.Generic;
using System.Text;

using Microsoft.Xna.Framework;

namespace SimpleGameEngine
{
    abstract public class BaseManager
    {
        private MainGame game;
        public MainGame Game
        {
            get { return this.game; }
        }

        public String Name
        {
            get { return this.GetName(); }
        }

        public BaseManager(MainGame game)
        {
            this.game = game;
        }

        public virtual void LoadContent() {}
        public virtual void UnloadContent() {}
        public virtual void Update(GameTime gameTime) {}
        public virtual void Draw(GameTime gameTime) {}

        protected virtual void Initialize()
        {
            this.game.AddManager(this);
        }

        // Name of the manager
        protected abstract String GetName();
    }
}
RenderManager
The first thing we'll do is make RenderManager derive from BaseManager:
public class RenderManager : BaseManager
Now, we need to handle the abstract method 'GetName' from the base class. If we ever want to look for the RenderManager in our engine we'll be able to do it by name, that is what this function with help with. We want the user to be able to look for it by the name "Render". So our function is this:
protected override String GetName()
{
    return "Render";
}
Ok we still need to create a constructor for this class. Because the BaseManager requires a MainGame, we need it as well so we can pass it through. And in the case of this class it's all we'll need:
public RenderManager(MainGame game)
    : base(game)
{
    Initialize();
}
As I said in 'BaseManager', all Managers call Initialize() during construction. If you don't handle anything within this derived class during initialization then you don't technically need to create a function handler for it, but there's a good chance we'll need it eventually so let's just add it:protected override void Initialize()
{
base.Initialize();
}
Because the RenderManager is manager of all things rendering I put an accessor here to the Xna.Game class' GraphicsDeviceManager and Graphics Device:
public GraphicsDeviceManager Graphics
{
get { return this.Game.Graphics; }
set { this.Game.Graphics = value; }
}
public GraphicsDevice GraphicsDevice
{
get { return this.Game.GraphicsDevice; }
}
I also moved the SpriteBatch instance out of MainGame
private SpriteBatch spriteBatch;
public SpriteBatch SpriteBatch
{
get { return spriteBatch; }
}
The render manager has a single BasicEffect that is used for rendering (at least at this point in time). So we'll create the variable for it, and a function to load the effect:
private BasicEffect effect;
private void LoadBasicEffect()
{
effect = new BasicEffect(this.GraphicsDevice);
effect.EnableDefaultLighting();
}
Try and keep your variables at the top/bottom of your code, and your functions on the other side. Don't mix them. The samples I'm posting just show the relationship between them, it doesn't imply they'll go next to each other in the final product.
We'll also want a String variable to hold the name of the currently rendering camera.
private String currentCameraEntityName = EngineCommon.RootEntityName;
'EngineCommon' and 'RootEntityName' are defined in another file we'll get to soon. Don't expect your code to compile until we reach the first milestone.
LoadContent is called on all Managers when the MainGame begins its LoadContent phase. We'll want to handle that function to load up our BasicEffect and SpriteBatch:
public override void LoadContent()
{
LoadBasicEffect();
// Create a new SpriteBatch, which can be used to draw textures.
spriteBatch = new SpriteBatch(this.GraphicsDevice);
}
And finally we're left with the Draw function. Pay close attention to this part because it involves some engine architecture discussion.
- The MainGame class (which we haven't filled out yet) holds a list of all managers, of which there are currently just SceneManager and RenderManager.
- SceneManager holds all of the entities loaded into the scene.
- Each entity can hold multiple components, but only one per type.
- CameraComponent is just one of any number of components we may eventually have, it is an example of a component that an entity can have.
So back to the Draw() function. What we want to do during the draw phase is get all entities in the scene, grab their render descriptions, and grab the camera, and use the camera's properties to render with. So how do we get all the information from within the RenderManager? The arrows in the above image represent the areas we need to go. As we just said above, the SceneManager holds all entities, so we need to get the entities from there, and the CameraComponent on the current rendering camera will have camera-specific information we need.
As we'll see later, the MainGame class lets us access any Manager class by its name, which in the case of the SceneManager is "scene". Once we have access to the SceneManager it in turn has a method to let us access all an entity by name. We use the camera's name (which we'll learn about later) to find the entity that is currently serving as the camera. SceneManager also has the functionality to let us grab all entities in the scene, so we grab that list as well.
And now based on all of that, we can render the scene:
public override void Draw(GameTime gameTime)
{
SceneManager sceneMgr = this.Game.GetManager("Scene") as SceneManager;
if (null == sceneMgr)
{
throw new Exception("Scene manager not registered properly to the game engine");
}
BaseEntity cameraEntity = sceneMgr.GetEntity(currentCameraEntityName);
if (null == cameraEntity)
{
throw new Exception("A camera entity must always exist if we are trying to render a scene");
}
CameraComponent camComp = cameraEntity.GetComponent("Camera") as CameraComponent;
if (null == camComp)
{
throw new Exception("An entity was designated as a camera but never given a camera component");
}
this.GraphicsDevice.Clear(Color.CornflowerBlue);
List<renderdescription> renderDescriptions = new List<renderdescription>();
// Get all entities in the scene
Dictionary<string, baseentity> entities = sceneMgr.Entities;
foreach (KeyValuePair<string, baseentity> pair in entities)
{
(pair.Value).Draw(gameTime, renderDescriptions);
}
foreach (RenderDescription desc in renderDescriptions)
{
if (null != desc.model)
{
// Copy any parent transforms.
Matrix[] transforms = new Matrix[desc.model.Bones.Count];
desc.model.CopyAbsoluteBoneTransformsTo(transforms);
// Draw the model. A model can have multiple meshes, so loop.
foreach (ModelMesh mesh in desc.model.Meshes)
{
// This is where the mesh orientation is set, as well
// as our camera and projection.
foreach (BasicEffect effect in mesh.Effects)
{
effect.World = desc.worldTransform;
effect.View = Matrix.CreateLookAt(cameraEntity.position,
Vector3.Zero, Vector3.Up);
effect.Projection = Matrix.CreatePerspectiveFieldOfView(
MathHelper.ToRadians(45.0f), camComp.AspectRatio, 1.0f, 5000.0f);
}
// Draw the mesh, using the effects set above.
mesh.Draw();
}
}
else if (null != desc.geoPrim)
{
// Set our vertex declaration, vertex buffer, and index buffer.
this.Game.GraphicsDevice.SetVertexBuffer(desc.geoPrim.VertexBuffer);
this.Game.GraphicsDevice.Indices = desc.geoPrim.IndexBuffer;
foreach (EffectPass effectPass in effect.CurrentTechnique.Passes)
{
effect.World = desc.worldTransform;
effect.View = Matrix.CreateLookAt(cameraEntity.position,
(cameraEntity.position + cameraEntity.rotation.Forward), Vector3.Up);
effect.Projection = Matrix.CreatePerspectiveFieldOfView(
MathHelper.ToRadians(45.0f), camComp.AspectRatio, 1.0f, 5000.0f);
effectPass.Apply();
int primitiveCount = (desc.geoPrim.Indices.Count / 3);
this.Game.GraphicsDevice.DrawIndexedPrimitives(PrimitiveType.TriangleList, 0, 0,
desc.geoPrim.Vertices.Count, 0, primitiveCount);
}
}
}
}
You can see here we get the scene manager and store it (and make sure it's valid). We grab the camera entity as well, and then specifically grab its camera component because that has the aspect ratio information we'll need.
We then create a list of render descriptions and then call Draw() on all entities, passing the list to each entity. As we'll see later entities that have render components simply add to that list their own model or primitive.
One we have the list of render descriptions we simply go through each one in the list and render the model or the primitive.
Here's the code for the entire RenderManager:
using System;
using System.Collections.Generic;
using System.Text;
using Microsoft.Xna.Framework;
using Microsoft.Xna.Framework.Graphics;
using SimpleGameEngine.Scene;
using SimpleGameEngine.Entity;
using SimpleGameEngine.Components;
namespace SimpleGameEngine.Render
{
public class RenderManager : BaseManager
{
public GraphicsDeviceManager Graphics
{
get { return this.Game.Graphics; }
set { this.Game.Graphics = value; }
}
public GraphicsDevice GraphicsDevice
{
get { return this.Game.GraphicsDevice; }
}
private SpriteBatch spriteBatch;
public SpriteBatch SpriteBatch
{
get { return spriteBatch; }
}
private BasicEffect effect;
private String currentCameraEntityName = EngineCommon.RootEntityName;
protected override String GetName()
{
return "Render";
}
public RenderManager(MainGame game)
: base(game)
{
Initialize();
}
protected override void Initialize()
{
    base.Initialize();
}
public override void LoadContent()
{
    LoadBasicEffect();

    // Create a new SpriteBatch, which can be used to draw textures.
    spriteBatch = new SpriteBatch(this.GraphicsDevice);
}
private void LoadBasicEffect()
{
effect = new BasicEffect(this.GraphicsDevice);
effect.EnableDefaultLighting();
}
public override void Draw(GameTime gameTime)
{
    SceneManager sceneMgr = this.Game.GetManager("Scene") as SceneManager;
    if (null == sceneMgr)
    {
        throw new Exception("Scene manager not registered properly to the game engine");
    }

    BaseEntity cameraEntity = sceneMgr.GetEntity(currentCameraEntityName);
    if (null == cameraEntity)
    {
         throw new Exception("A camera entity must always exist if we are trying to render a scene");
    }

    CameraComponent camComp = cameraEntity.GetComponent("Camera") as CameraComponent;
    if (null == camComp)
    {
        throw new Exception("An entity was designated as a camera but never given a camera component");
    }

    this.GraphicsDevice.Clear(Color.CornflowerBlue);

    List<renderdescription> renderDescriptions = new List<renderdescription>();

    // Get all entities in the scene
    Dictionary<string, baseentity> entities = sceneMgr.Entities;

    foreach (KeyValuePair<string, baseentity> pair in entities)
    {
        (pair.Value).Draw(gameTime, renderDescriptions);
    }

    foreach (RenderDescription desc in renderDescriptions)
    {
        if (null != desc.model)
        {
            // Copy any parent transforms.
            Matrix[] transforms = new Matrix[desc.model.Bones.Count];
            desc.model.CopyAbsoluteBoneTransformsTo(transforms);

            // Draw the model. A model can have multiple meshes, so loop.
            foreach (ModelMesh mesh in desc.model.Meshes)
            {
                // This is where the mesh orientation is set, as well
                // as our camera and projection.
                foreach (BasicEffect effect in mesh.Effects)
                {
                    effect.World = desc.worldTransform;
                    effect.View = Matrix.CreateLookAt(cameraEntity.position,
                        Vector3.Zero, Vector3.Up);
                    effect.Projection = Matrix.CreatePerspectiveFieldOfView(
                        MathHelper.ToRadians(45.0f), camComp.AspectRatio, 1.0f, 5000.0f);
                }
                // Draw the mesh, using the effects set above.
                mesh.Draw();
            }
        }
        else if (null != desc.geoPrim)
        {
            // Set our vertex declaration, vertex buffer, and index buffer.
            this.Game.GraphicsDevice.SetVertexBuffer(desc.geoPrim.VertexBuffer);
            this.Game.GraphicsDevice.Indices = desc.geoPrim.IndexBuffer;

            foreach (EffectPass effectPass in effect.CurrentTechnique.Passes)
            {
                effect.World = desc.worldTransform;
                effect.View = Matrix.CreateLookAt(cameraEntity.position,
                          (cameraEntity.position + cameraEntity.rotation.Forward), Vector3.Up);
                effect.Projection = Matrix.CreatePerspectiveFieldOfView(
                          MathHelper.ToRadians(45.0f), camComp.AspectRatio, 1.0f, 5000.0f);

                effectPass.Apply();

                int primitiveCount = (desc.geoPrim.Indices.Count / 3);

                this.Game.GraphicsDevice.DrawIndexedPrimitives(PrimitiveType.TriangleList, 0, 0,
                                             desc.geoPrim.Vertices.Count, 0, primitiveCount);

            }
        }
    }
}
}
}
In part 2, we go over the SceneManager and MainGame classes.
Subscribe to:
Posts (Atom)