Tuesday, November 29, 2011

QuickStart Engine v0.23 released!

For a year my open-source game engine for XNA had been incompatible with the newest version of XNA (version 4.0). With work and other responsibilities I hadn't had the time to get to updating it until recently. So for anyone interested in a basic game engine for XNA 4.0, here you go:
http://quickstartengine.codeplex.com/

If you just want to try out the demo program, try this link:
http://quickstartengine.codeplex.com/releases/view/77590#DownloadId=308132

These are screenshots from v0.22, but it's visually almost identical to v0.23

Friday, November 25, 2011

Converting the Quickstart Game Engine to XNA 4.0

Microsoft made a lot of changes to XNA between 3.1 and 4.0, and only recently have I had the time to look into converting the Quickstart Game Engine to run in XNA 4.0.

Here's Shawn Hargreaves list of breaking changes (changes that will break the engine) in XNA 4.0:
http://blogs.msdn.com/b/shawnhar/archive/2010/03/16/breaking-changes-in-xna-game-studio-4-0.aspx

Some of these are a real pain, specifically the fact that they got rid of point sprites, which the particle system uses, and clipping planes, which the water planes use to render reflections and refractions.

Those are the two that I'll be struggling with for the next couple of days, but hopefully I'll soon have the engine running on XNA 4.0. I've also identified some possible significant performance benefits I may implement as well.

Stay tuned.

Screenshot from Quickstart Engine 0.22 (running on XNA 3.1):

Friday, November 18, 2011

Let's Make a Game Engine for XNA 4.0r, Part 5, RenderDescriptions, Vertex Declaration, and everything else

In Part 4 of this series we covered the Render and Camera Components. RenderComponent uses RenderDescriptions to hold information about its mesh so the RenderManager can render it, and that RenderDescription holds either a Model (which is a standard XNA class), or a GeometricPrimitive (which is part of this engine).

GeometricPrimitive
GeometricPrimitive is a base class I've built into the engine, but it was written by Microsoft's XNA team as part of a sample, as such I'm not going to cover much about it other than the basics. There are 7 files that are part of this system, and I modified each one slightly to be part of the project, if you're creating your own project rather than using the downloaded one you'll want to just copy the GeometricPrimitives directory out of the download project into your project, and you'll need to make sure the namespaces match within each file as well.

GeometricPrimitive takes a GraphicsDevice as part of its constructor. Based on the shape of the primitive it constructs a VertexBuffer, a list of its verticies, an IndexBuffer, and a list of its indices. Based on those variables we will have enough information to render the primitive. The only changes I made to these classes after putting them into this engine was to remove the #regions, and I pulled the BasicEffect out of the class itself since the RenderManager handles the rendering. Most importantly, I added the enum GeometricPrimitiveType to the GeometricPrimitive.cs file to allow users to use an enum type to create a shape for them:
public enum GeometricPrimitiveType
{
    Cube,
    Sphere,
    Cylinder,
    Torus,
    Teapot
}
If you look in the downloaded version of the engine you'll notice a 6th primitive shape called a BezierPrimitive. This isn't used directly, it is used by the TeapotPrimitive.

Here is a link to the original Geometric Primitives sample if you would like to learn more:
http://create.msdn.com/en-US/education/catalog/sample/primitives_3d


VertexPositionNormal
This class is an IVertexType (which is a standard XNA type). When creating a list of vertices you need to have a vertex type, this is the vertex type used by the Geometric Primitives, this file is also from Microsoft's sample. Place VertexPositionNormal.cs in the RenderManager folder. Here's the entire file:
using Microsoft.Xna.Framework;
using Microsoft.Xna.Framework.Graphics;

namespace SimpleGameEngine.Render
{
    /// 
    /// Custom vertex type for vertices that have just a
    /// position and a normal, without any texture coordinates.
    /// 
    public struct VertexPositionNormal : IVertexType
    {
        public Vector3 Position;
        public Vector3 Normal;

        /// 
        /// Constructor.
        /// 
        public VertexPositionNormal(Vector3 position, Vector3 normal)
        {
            Position = position;
            Normal = normal;
        }

        /// 
        /// A VertexDeclaration object, which contains information about the vertex
        /// elements contained within this struct.
        /// 
        public static readonly VertexDeclaration VertexDeclaration = new VertexDeclaration
        (
            new VertexElement(0, VertexElementFormat.Vector3, VertexElementUsage.Position, 0),
            new VertexElement(12, VertexElementFormat.Vector3, VertexElementUsage.Normal, 0)
        );

        VertexDeclaration IVertexType.VertexDeclaration
        {
            get { return VertexPositionNormal.VertexDeclaration; }
        }

    }
}

RenderDescription
RenderDescription is a data class, it holds no functionality, just holds data that can be passed between a RenderComponent and the RenderManager. Create RenderDescription.cs and place it inside of the RenderManager folder. The data RenderDescription holds is:

A Model (XNA's Model Class), or a GeometricPrimitive. It shouldn't hold both, the RenderManager will check if the Model exists first, and if it doesn't it will then check for a GeometricPrimitive, there's no reason to use both.  This class also holds the worldTransform Matrix. And that's it. Here's the entire file:
using System;
using System.Collections.Generic;
using System.Text;

using Microsoft.Xna.Framework;
using Microsoft.Xna.Framework.Graphics;

using SimpleGameEngine.GeometricPrimitives;

namespace SimpleGameEngine.Render
{
    public class RenderDescription
    {   
        // A render description must contain either a Model, or
        // a GeometricPrimitive

        public Model model;
        public GeometricPrimitive geoPrim;

        public Matrix worldTransform = Matrix.Identity;

        public RenderDescription()
        {

        }
    }
}

EngineCommon
This is a file that will contain common constants used throughout the project. Create a file called EngineCommon.cs and place it in the main GameEngine folder (same level as Main.cs). Right now this just contains a variable for the name of the default root entity. Here's the entire file:
using System;
using System.Collections.Generic;
using System.Text;

namespace SimpleGameEngine
{
    public class EngineCommon
    {
        public const String RootEntityName = "Root";
    }
}

And that's it for our first milestone. At this point you got a lot of good practice watching the engine come together, and if you made your own files and code as you went along you should know it pretty well. Along the way there was a good chance for a typo on either my or your part, if your project doesn't compile I recommend just using the downloaded version of the engine, and if you want to change things around a little feel free to alter it to your liking, the license on the engine is such that you can do whatever you want with it.

So let's run the engine (press F5 to build and run attached), and what we should get is two loaded entities, one is the root entity, and the other is a primitive cube in front of the camera.


And there we have it. Now lets reflect back on things a bit. We took an awfully long time to make a program that renders a cube, we could have done it in about 1/10th the time, with much less code. However, the goal wasn't really to make a cube rendering program, what we wanted was the start to a flexible game engine that is extensible and reusable. If you think about it we could very easily change the program to render a stack of cubes, so let's give that a shot. If you remember the place we're temporarily using to load entities into our scene is within the SceneManager, so open that up and look for LoadContent().

Add this at the bottom of the function (but within the temporary lines comments):
BaseEntity testCube2 = new BaseEntity(this, "Cube2");
testCube2.position = new Vector3(0, -1.01f, -10);

RenderComponent rendComp2 = new RenderComponent(testCube2, GeometricPrimitiveType.Cube);

AddEntityToScene(testCube2);

BaseEntity testCube3 = new BaseEntity(this, "Cube3");
testCube3.position = new Vector3(0, 1.01f, -10);

RenderComponent rendComp3 = new RenderComponent(testCube3, GeometricPrimitiveType.Cube);

AddEntityToScene(testCube3);

And now we see this:

After some new additions to the engine it'll be able to do a lot more than this. From here on I won't be going into as much detail about setting everything up line by line, I will publish new versions of the engine that you can download, and I will go into some detail about new functionality. The biggest reason for this is because it takes a lot longer to blog about making an engine than it does to actually make it. I made this entire engine as you see it now in 7 hours, and it took about 15 hours to blog about it. The idea behind this project is that I will create a simple but extensive framework from which I will be able to create demos and samples that I can post on my blog, and the posted sample and code will relate to each other without me having to describe the entire engine to the use. For example if I want to create a spline cinematic camera demo, and I did it from scratch, there would be a ton of code in there that most people do not care about, now the engine can take place of that code and sit hidden from view so people can concentrate on the math and features behind such a camera system.

I will keep you guys posted on new versions of the engine, as well as posting samples that use the engine. Thanks for reading!

Let's Make a Game Engine for XNA 4.0r, Part 4, RenderComponent and CameraComponent

In Part 3 of this series we covered BaseEntity and BaseComponent. Entities and Components are really at the heart of gameplay in any object/entity and component-based game engine, for example, in LEGO Universe we had over 110 different types of components, including a scripting component that allowed scripts to do all kinds of custom gameplay. In this post (Part 4) we will create our first two components, RenderComponent, and CameraComponent, and to start with we'll keep them extremely simple. Remember, our first milestone goal is just to render a cube on the screen with the engine.

RenderComponent
Ok, let's start with RenderComponent. First, make sure you derive RenderComponent from BaseComponent:
public class RenderComponent : BaseComponent

And the only two objects this class holds for now is a RenderDescription (which we'll get to see in Part 5), and a Matrix that defines the scale of the render mesh (although we won't implement scale until after the first milestone):
private RenderDescription description;
private Matrix scaleMatrix = Matrix.Identity;
Notice we don't have accessors for these. The only time you want an accessor in a component is for data you want other users to be able to access or alter from outside the component. But if we make a script component giving access to these variables is as easy as making an accessor or function.

Next you'll see that derived components, like derived managers, must handle GetName():
protected override String GetName()
{
    return "Render";
}

RenderComponent will start out with two constructors, one in which the user can create a render component based on the name of an asset in the content pipeline, and another in which the user can create a render component based on a geometric primitive:
public RenderComponent(BaseEntity ParentEntity, String ModelName) :
    base(ParentEntity)
{            
    Initialize();

    LoadModel(ModelName);
}

public RenderComponent(BaseEntity ParentEntity, GeometricPrimitiveType primitiveType) :
    base(ParentEntity)
{
    Initialize();

    LoadPrimitive(primitiveType);
}
Notice the component pass the 'ParentEntity' reference to the base class, which is BaseComponent. BaseComponent stores that reference, and when the derived component calls base.Initilize(), within its own Initialize() method, then BaseComponent attaches the component to the Entity.

You can see based on which constructor is called we use a function called LoadModel() and pass in the name of the model, or another called LoadPrimitive() and pass in the type of primitive, here are those methods:
private void LoadModel(String modelName)
{
    description.model = this.Parent.Manager.Content.Load<model>(modelName);
}

private void LoadPrimitive(GeometricPrimitiveType primitiveType)
{
    switch (primitiveType)
    {
        case GeometricPrimitiveType.Cube:
            description.geoPrim = new CubePrimitive(this.Parent.Manager.Game.GraphicsDevice);
            break;
        case GeometricPrimitiveType.Sphere:
            description.geoPrim = new SpherePrimitive(this.Parent.Manager.Game.GraphicsDevice);
            break;
        case GeometricPrimitiveType.Cylinder:
            description.geoPrim = new CylinderPrimitive(this.Parent.Manager.Game.GraphicsDevice);
            break;
        case GeometricPrimitiveType.Torus:
            description.geoPrim = new TorusPrimitive(this.Parent.Manager.Game.GraphicsDevice);
            break;
        case GeometricPrimitiveType.Teapot:
            description.geoPrim = new TeapotPrimitive(this.Parent.Manager.Game.GraphicsDevice);
            break;
        default:
            throw new Exception("LoadPrimitive does not handle this type of GeometricPrimitive. Was a new primitive type made and not handled here?");
    }
}
Within LoadModel we utilitize the ContentManager to load our asset based on its name. ContentManager can be access from a component by going through the Entity, then SceneManager. And within LoadPrimitive we use an enum of a primitive type to decide which primitive to load. I will go over the GeometricPrimitives briefly in Part 5, there will be no need to go into them in full detail, as I didn't write them, they are extracted from a Microsoft XNA Sample that you can use if you wish to learn about them.

In our Update() method we make sure our render mesh's worldTransform is updated just in case the position or rotation of the entity changed. Please note that this is not the most efficient way to do this, what would be more efficient is to have components that care about changes to position or rotation listen for those changes, and when a change occurs then update the worldTransform. Maybe I'll do this in a later version of the engine. The worldTransform is a matrix that holds the scale, rotation, and translation (position) of a mesh. This is needed by the shaders to properly render the mesh:
public override void Update(GameTime gameTime)
{
    description.worldTransform = this.scaleMatrix * this.Parent.rotation * Matrix.CreateTranslation(this.Parent.position);
}

And finally is our Draw method. Draw is called by XNA's base Game class, and we pass it through to the RenderManager, which calls Draw on all entities to request all of the RenderDescriptions they may have. Having already seen RenderManager in a previous section I won't explain what it does with those RenderDescriptions. But RenderDescriptions are covered in Part 5.
public override void Draw(GameTime gameTime, List renderDescriptions)
{
    // Could do frustum culling here if we wanted to be more efficient.
        // We could go a step further and gather the entities within sections of an octree that are
        // currently within the view frustum, then skip the frustum check here.

    renderDescriptions.Add(description);
}

And that's it for RenderComponent. Here's the entire file:
using System;
using System.Collections.Generic;
using System.Text;

using Microsoft.Xna.Framework;
using Microsoft.Xna.Framework.Graphics;

using SimpleGameEngine.Entity;
using SimpleGameEngine.Render;
using SimpleGameEngine.GeometricPrimitives;

namespace SimpleGameEngine.Components
{
    public class RenderComponent : BaseComponent
    {
        private RenderDescription description;
        private Matrix scaleMatrix = Matrix.Identity;

        protected override String GetName()
        {
            return "Render";
        }

        public RenderComponent(BaseEntity ParentEntity, String ModelName) :
            base(ParentEntity)
        {            
            Initialize();

            LoadModel(ModelName);
        }

        public RenderComponent(BaseEntity ParentEntity, GeometricPrimitiveType primitiveType) :
            base(ParentEntity)
        {
            Initialize();

            LoadPrimitive(primitiveType);
        }

        protected override void Initialize()
        {
            description = new RenderDescription();

            description.worldTransform = this.scaleMatrix * this.Parent.rotation * Matrix.CreateTranslation(this.Parent.position);

            base.Initialize();
        }

        private void LoadModel(String modelName)
        {
            description.model = this.Parent.Manager.Content.Load<Model>(modelName);
        }

        private void LoadPrimitive(GeometricPrimitiveType primitiveType)
        {
            switch (primitiveType)
            {
                case GeometricPrimitiveType.Cube:
                    description.geoPrim = new CubePrimitive(this.Parent.Manager.Game.GraphicsDevice);
                    break;
                case GeometricPrimitiveType.Sphere:
                    description.geoPrim = new SpherePrimitive(this.Parent.Manager.Game.GraphicsDevice);
                    break;
                case GeometricPrimitiveType.Cylinder:
                    description.geoPrim = new CylinderPrimitive(this.Parent.Manager.Game.GraphicsDevice);
                    break;
                case GeometricPrimitiveType.Torus:
                    description.geoPrim = new TorusPrimitive(this.Parent.Manager.Game.GraphicsDevice);
                    break;
                case GeometricPrimitiveType.Teapot:
                    description.geoPrim = new TeapotPrimitive(this.Parent.Manager.Game.GraphicsDevice);
                    break;
                default:
                    throw new Exception("LoadPrimitive does not handle this type of GeometricPrimitive. Was a new primitive type made and not handled here?");
            }
        }

        public override void Update(GameTime gameTime)
        {
            description.worldTransform = this.scaleMatrix * this.Parent.rotation * Matrix.CreateTranslation(this.Parent.position);
        }

        public override void Draw(GameTime gameTime, List<RenderDescription> renderDescriptions)
        {
            // Could do frustum culling here if we wanted to be more efficient.
                // We could go a step further and gather the entities within sections of an octree that are
                // currently within the view frustum, then skip the frustum check here.

            renderDescriptions.Add(description);
        }
    }
}

CameraComponent
Next up we have CameraComponent, which at this time does virtually nothing special. You see, to render a basic camera we need position, rotation, and aspect ratio. Position and rotation are part of all entities, existing within BaseEntity, so for now that just leaves aspect ratio as the only thing we need the camera component for. But later on it will do more advanced things.

Rather than go over each part of such a simple class, I will post the entire file here. The only thing worth noting is that is has an aspectRatio variable which is initializes to be based on the dimensions of the viewport/window.

using System;
using System.Collections.Generic;
using System.Text;

using Microsoft.Xna.Framework;
using Microsoft.Xna.Framework.Graphics;

using SimpleGameEngine.Entity;
using SimpleGameEngine.Render;

namespace SimpleGameEngine.Components
{
    public class CameraComponent : BaseComponent
    {
        private float aspectRatio;
        public float AspectRatio
        {
            get { return aspectRatio; }
        }

        protected override String GetName()
        {
            return "Camera";
        }

        public CameraComponent(BaseEntity ParentEntity) :
            base(ParentEntity)
        {            
            Initialize();
        }

        protected override void Initialize()
        {            
            // Default aspect ratio is that of the viewport/window
            aspectRatio = this.Parent.Manager.Game.GraphicsDevice.Viewport.AspectRatio;

            base.Initialize();
        }
    }
}

And that's it for Part 4. In Part 5 we're going to cover everything that remains for the first milestone for this engine, after which point you should be at the same point as if you had downloaded the engine yourself.

Let's Make a Game Engine for XNA 4.0r, Part 3, BaseEntity and BaseComponent

In Part 2 we discussed the MainGame and SceneManager classes. If you remember, SceneManager holds the list of all entities in the scene, and we learned a bit about how entities are created and how components are attached to them. Now we'll learn about Entities and Components, specifically their base classes for each.

First you'll need to create two folders within the main project, named "Components", and "Entity". Within components create a file called "BaseComponent.cs", and within Entity create a file called "BaseEntity.cs". You're file structure should now look like this:

BaseEntity is not an abstract class, in fact, most entities will get their properties from their components, and the entity is just what ties those components together. BaseComponent however is abstract, all components must derived directly or indirectly from BaseComponent.

BaseEntity
Ok, let's start with BaseEntity. Since Entities belong to the SceneManager we allow BaseEntity to keep a reference to the SceneManager, which also gives it access to the MainGame through the SceneManager. Also, just like Managers, Entities has names. The difference with Entities is that since the base class is not abstract, the name can be stored directly on the Entity rather than requiring a GetName() function.

private SceneManager manager;
public SceneManager Manager
{
    get { return manager; }
}

private String name;
public String Name
{
    get { return name; }
}

Entities hold a Dictionary of components based on their names, just like MainGame holds a list of Managers based on names, and SceneManager holds a list of Entities based on their names. And like the SceneManager, Entity also has Add/Remove/Get methods to add and get components by their names.
private Dictionary<String, BaseComponent> components;

public void AddComponent(BaseComponent component)
{
    BaseComponent checkComponent = null;
    if (components.TryGetValue(component.Name, out checkComponent))
    {
         throw new Exception("Component type " + component.Name + " already exists on this object: " + name);
    }

    components.Add(component.Name, component);
}

public void RemoveComponent(BaseComponent component)
{
    BaseComponent checkComponent = null;
    if (!components.TryGetValue(component.Name, out checkComponent))
    {
        throw new Exception("Component type " + component.Name + " doesn't exists on this object: " + name);
    }

    components.Remove(component.Name);
}

public BaseComponent GetComponent(String componentName)
{
    BaseComponent component = null;
    if (!components.TryGetValue(componentName, out component))
    {
        // Component wasn't found
    }

    return component;
}

And the remaining functions serve only to pass Update and Draw calls to each component:
public void Update(GameTime gameTime)
{
    foreach (KeyValuePair<String, BaseComponent> pair in components)
    {
        (pair.Value).Update(gameTime);
    }
}

public void Draw(GameTime gameTime, List<RenderDescription> renderDescriptions)
{
    foreach ( KeyValuePair<String, BaseComponent> pair in components )
    {
        (pair.Value).Draw(gameTime, renderDescriptions);
    }
}

Here's the full BaseEntity file:
using System;
using System.Collections.Generic;
using System.Linq;
using System.Text;

using Microsoft.Xna.Framework;
using Microsoft.Xna.Framework.Graphics;

using SimpleGameEngine.Scene;
using SimpleGameEngine.Components;
using SimpleGameEngine.Render;

namespace SimpleGameEngine.Entity
{
    public class BaseEntity
    {
        private SceneManager manager;
        public SceneManager Manager
        {
            get { return manager; }
        }

        private String name;
        public String Name
        {
            get { return name; }
        }

        private Dictionary<string, basecomponent> components;

        // Public for performance reasons, accessors cause copies
        public Vector3 position = Vector3.Zero;        
        public Matrix rotation = Matrix.Identity;

        public BaseEntity(SceneManager sceneManager, String EntityName)
        {
            this.components = new Dictionary<string, basecomponent>();

            this.manager = sceneManager;
            this.name = EntityName;
        }

        public void AddComponent(BaseComponent component)
        {
            BaseComponent checkComponent = null;
            if (components.TryGetValue(component.Name, out checkComponent))
            {
                throw new Exception("Component type " + component.Name + " already exists on this object: " + name);
            }

            components.Add(component.Name, component);
        }

        public void RemoveComponent(BaseComponent component)
        {
            BaseComponent checkComponent = null;
            if (!components.TryGetValue(component.Name, out checkComponent))
            {
                throw new Exception("Component type " + component.Name + " doesn't exists on this object: " + name);
            }

            components.Remove(component.Name);
        }

        public BaseComponent GetComponent(String componentName)
        {
            BaseComponent component = null;
            if (!components.TryGetValue(componentName, out component))
            {
                // Component wasn't found
            }

            return component;
        }

        public void Update(GameTime gameTime)
        {
            foreach (KeyValuePair<string, basecomponent> pair in components)
            {
                (pair.Value).Update(gameTime);
            }
        }

        public void Draw(GameTime gameTime, List renderDescriptions)
        {
            foreach ( KeyValuePair<string, basecomponent> pair in components )
            {
                (pair.Value).Draw(gameTime, renderDescriptions);
            }
        }
    }
}

BaseComponent
BaseComponent is a very small and simple class, for now at least. It just holds common properties that all components must derived from. BaseComponent holds the reference to the Entity that it is connected to, this lets all components communicate up to the Entity. The reference to the Entity is stored from within the constructor:
private BaseEntity parent;
public BaseEntity Parent
{
    get { return parent; }
}

public BaseComponent(BaseEntity parentEntity)
{
    this.parent = parentEntity;
}

By now you should be getting a feel for some common things in the engine, such as accessing systems by Strings, and Initialization methods registering systems with their owners. In the case of components they handle a GetName() function just like Managers and Entities, and they also have an Initialization function that registers the component with the Entity:
public String Name
{
    get { return this.GetName(); }
}

// Name of the component
protected abstract String GetName();
        
protected virtual void Initialize()
{
    this.parent.AddComponent(this);
}

And all we're left with is a declaration of a virtual Update and virtual Draw function, which allows components to receive either of these from the SceneManager:
public virtual void Update(GameTime gameTime) {}
public virtual void Draw(GameTime gameTime, List renderDescriptions) {}

Here's the entire file for 'BaseComponent.cs':
using System;
using System.Collections.Generic;
using System.Text;

using Microsoft.Xna.Framework;
using Microsoft.Xna.Framework.Graphics;

using SimpleGameEngine.Entity;
using SimpleGameEngine.Render;

namespace SimpleGameEngine.Components
{
    abstract public class BaseComponent
    {
        private BaseEntity parent;
        public BaseEntity Parent
        {
            get { return parent; }
        }
        
        public String Name
        {
            get { return this.GetName(); }
        }

        public BaseComponent(BaseEntity parentEntity)
        {
            this.parent = parentEntity;
        }

        // Name of the component
        protected abstract String GetName();
        
        protected virtual void Initialize()
        {
            this.parent.AddComponent(this);
        }

        public virtual void Update(GameTime gameTime) {}
        public virtual void Draw(GameTime gameTime, List<renderdescription> renderDescriptions) {}
    }
}

Up next in Part 4 is the RenderComponent and CameraComponent.

Thursday, November 17, 2011

Let's Make a Game Engine for XNA 4.0r, Part 2, SceneManager and MainGame

The last post (Part 1 of this series) was about creating a BaseManager and RenderManager class. If you remember, when the RenderManager renders the scene it needs to get the list of entities to render, and those entities belong the the SceneManager. In order to get to the SceneManager we'll need to go through the MainGame class.

MainGame
So let's begin with the MainGame class (Main.cs). For now there are only two objects in this class, the GraphicsDeviceManager and the list of Managers. The list of Managers is the list that includes SceneManager, RenderManager, and others we will need in the future. The way a scripter or programmer will access the Managers is by name, which is a String, so our list of Managers will be a Dictionary with Strings as the key, and the Manager itself as the value. So let's create those objects and accessors for them:

private GraphicsDeviceManager graphics;
public GraphicsDeviceManager Graphics
{
    get { return this.graphics; }
    set { this.graphics = value; }
}

private Dictionary<String, BaseManager> managers;
public Dictionary<String, BaseManager> Managers
{
    get { return this.managers; }            
}

Next we'll create a constructor:
public MainGame()
{
    this.graphics = new GraphicsDeviceManager(this);
    this.Content.RootDirectory = "Content";      

    this.managers = new Dictionary<string, BaseManager>();    
}

We have to initialize the GraphicsDeviceManager here, before our parent class (Microsoft.Xna.Framework.Game) calls Initialize(). We have to call base.Initialize() within our handler of Initialize() (code below), otherwise we'll never get a call to LoadContent(), however, if we do not have a GraphicsDeviceManager we'll also never get a call to LoadContent().

Here's the order that XNA's base Game class calls things (or at least the part we care about for now):
Constructor, Initialize, LoadContent (if base.Initialize is called on the base class, and only if a GraphicsDeviceManager is loaded), Update, Draw, Update, Draw, etc...., UnloadContent (as game is closed down).

Anyway, here's the handler to the virtual Initialize method:
protected override void Initialize()
{
    SceneManager sceneManager = new SceneManager(this);
    RenderManager renderManager = new RenderManager(this);

    base.Initialize();
}

You can see we create the two Managers that we need. Notice we're passing them the reference to this MainGame instance. If you remember from the RenderManager class, it will take that reference, and during RenderManager's Initialize method it calls to BaseManager's Initialize method which registers that manager with MainGame. So it only takes a single line here to create a Manager instance and have it register with the MainGame. In order for BaseManager to register with MainGame, it needs a method within MainGame that allows it to do so. We'll call that method 'AddManager', and here it is:

public void AddManager(BaseManager manager)
{
    BaseManager checkManager = null;
    if (managers.TryGetValue(manager.Name, out checkManager))
    {
        throw new Exception("Manager type " + manager.Name + " already exists within the game engine");
    }

    managers.Add(manager.Name, manager);
}
We do a check to see if a Manager by the same name has already been registered with MainGame. This shouldn't happen, but better safe than sorry. Efficiency shouldn't be a problem here anyway, this method is only called a few times each time your game runs. The methods you really look at for optimization should be called either many times per frame, or are very time consuming methods.

The reason we add managers to a Dictionary is so that we can access them by name later on, so we'll need a method that lets us do that:
public BaseManager GetManager(String managerName)
{
    BaseManager manager = null;
    if (!managers.TryGetValue(managerName, out manager))
    {
        // Manager wasn't found
    }

    return manager;
}

And the rest of our methods are called from the base Game class and we simply pass them on to all registered Managers:
protected override void LoadContent()
{
    foreach (KeyValuePair<String, BaseManager> pair in managers)
    {
        (pair.Value).LoadContent();
    }
}

protected override void UnloadContent()
{
    foreach (KeyValuePair<String, BaseManager> pair in managers)
    {
        (pair.Value).UnloadContent();
    }
}

protected override void Update(GameTime gameTime)
{
    foreach (KeyValuePair<String, BaseManager> pair in managers)
    {
        (pair.Value).Update(gameTime);
    }
}

protected override void Draw(GameTime gameTime)
{
    foreach (KeyValuePair<String, BaseManager> pair in managers)
    {
        (pair.Value).Draw(gameTime);
    }

    base.Draw(gameTime);
}
You must register all Managers during MainGame's Initialize, because otherwise you will never get the call to LoadContent, because as you can see if only sends it to Managers that are registered.

And here is the full file:
using System;
using System.Collections.Generic;
using System.Linq;
using Microsoft.Xna.Framework;
using Microsoft.Xna.Framework.Audio;
using Microsoft.Xna.Framework.Content;
using Microsoft.Xna.Framework.GamerServices;
using Microsoft.Xna.Framework.Graphics;
using Microsoft.Xna.Framework.Input;
using Microsoft.Xna.Framework.Media;

using SimpleGameEngine.Scene;
using SimpleGameEngine.Render;

namespace SimpleGameEngine
{
    /// 
    /// This is the main type for your game
    /// 
    public class MainGame : Microsoft.Xna.Framework.Game
    {
        private GraphicsDeviceManager graphics;
        public GraphicsDeviceManager Graphics
        {
            get { return this.graphics; }
            set { this.graphics = value; }
        }

        private Dictionary<String, BaseManager> managers;
        public Dictionary<String, BaseManager> Managers
        {
            get { return this.managers; }            
        }

        public MainGame()
        {
            this.graphics = new GraphicsDeviceManager(this);
            this.Content.RootDirectory = "Content";      

            this.managers = new Dictionary<string, BaseManager>();    
        }

        protected override void Initialize()
        {
            SceneManager sceneManager = new SceneManager(this);
            RenderManager renderManager = new RenderManager(this);

            base.Initialize();
        }

        public void AddManager(BaseManager manager)
        {
            BaseManager checkManager = null;
            if (managers.TryGetValue(manager.Name, out checkManager))
            {
                throw new Exception("Manager type " + manager.Name + " already exists within the game engine");
            }

            managers.Add(manager.Name, manager);
        }

        public BaseManager GetManager(String managerName)
        {
            BaseManager manager = null;
            if (!managers.TryGetValue(managerName, out manager))
            {
                // Manager wasn't found
            }

            return manager;
        }

        protected override void LoadContent()
        {
            foreach (KeyValuePair<String, BaseManager> pair in managers)
            {
                (pair.Value).LoadContent();
            }
        }

        protected override void UnloadContent()
        {
            foreach (KeyValuePair<String, BaseManager> pair in managers)
            {
                (pair.Value).UnloadContent();
            }
        }

        protected override void Update(GameTime gameTime)
        {
            foreach (KeyValuePair<String, BaseManager> pair in managers)
            {
                (pair.Value).Update(gameTime);
            }
        }

        protected override void Draw(GameTime gameTime)
        {
            foreach (KeyValuePair<String, BaseManager> pair in managers)
            {
                (pair.Value).Draw(gameTime);
            }

            base.Draw(gameTime);
        }
    }
}

SceneManager
That leaves us with the SceneManager class. The SceneManager is in charge or running the scene, and all of the entities that exist within it. For now the SceneManager only has one object it is in charge of, and that is the list of entities. Just like with the Managers list in MainGame, the entity list is also a Dictionary with Strings as the key, and the entity as the value. Every entity has a name, and that is how they're located...just like the Managers. So let's start with our one object, its accessor, and an accessor to the ContentManager (which is not a class we've created, it's part of XNA's Game class):
private Dictionary<String, BaseEntity> entities;        
public Dictionary<String, BaseEntity> Entities
{
    get { return entities; }
}

public ContentManager Content
{
    get { return Game.Content; }
}

Also, just like RenderManager, SceneManager needs to handle the abstract GetName() method declared by BaseManager, this allows BaseManager to register SceneManager by its name with MainGame:
protected override String GetName()
{
    return "Scene";
}

And we'll need our constructor and Initialize methods, just like RenderManager, except in the case of SceneManager we need to create the instance of the Dictionary for the entities:
public SceneManager(MainGame Game)
            : base(Game)
{
    this.entities = new Dictionary();

    Initialize();
}

protected override void Initialize()
{
    base.Initialize();
}

The LoadContent function is where we load up the Root entity for the engine. There should always be one entity in a Scene otherwise you'll have no entity to act as a camera. So we will create an entity, and give it a CameraComponent, and then add it to the scene. You'll get to see the functionality behind most of this in Part 3 of this series:
public override void LoadContent()
{
    // We always have at least one entity in the world. We'll create that now and then
    // make it our main camera for the game.
    BaseEntity entity = new BaseEntity(this, EngineCommon.RootEntityName);

    // The component will automatically attach to the entity that we pass into it
    CameraComponent camComp = new CameraComponent(entity);

    // Now we add the entity to the scene
    AddEntityToScene(entity);

    // ===================================================================================
    // TEMPORARY!!!!!!!!!!!!!!!!!!!!!!!!!!
    BaseEntity testCube = new BaseEntity(this, "Cube");
    testCube.position = new Vector3(0, 0, -10);

    RenderComponent rendComp = new RenderComponent(testCube, GeometricPrimitiveType.Cube);

    AddEntityToScene(testCube);
    // ===================================================================================
}
There's a lot going on here, lets run down exactly what is happening.

  • We create a BaseEntity, and pass it a reference to this SceneManager, and we also pass it a String for its name. In this case it's the root entity for the game so we give it the default root entity name. NOTE: BaseEntities do not automatically register with the SceneManager, this is because they're not complete until they have all of their components loaded onto them, and if we decide to make this engine multi-threaded then adding it to the list before it has components could cause it to be run without components.
  • We create a CameraComponent, and pass it a reference to the BaseEntity that it belongs to. All components will automatically attach the a BaseEntity. We'll see later that Component are just like many other classes, during their initialization they ball BaseComponent which registers them with an Entity.
  • And now that our BaseEntity has all of the components it needs we can add it to the scene by calling AddEntityToScene (which we'll see soon in code below).
  • Notice the large comment that says "TEMPORARY" here. This code is only here during this milestone, as a way to easily load up a cube so we can see that we're successfully rendering something.
  • We create the cube, naming it "Cube", and we update its position to be at (0, 0, -10). Because our camera we loaded is using its default rotation (Matrix::Identity), and means its facing directly down the -Z axis, so putting the cube here should put it 10 units in front of the camera.
  • We create a RenderComponent (which we'll see in Part 3 or 4), and assign it to our BaseEntity, and we create it with a GeometricPrimitiveType of Cube (we'll see this in part 3 or 4 as well).
  • And now that the entity is ready with its component we add it to the scene.
Whew...now that we're done with that let's continue. All Managers can handle the Update method, which is called each frame by MainGame, so we'll handle it, and pass the Update to all entities (and eventually only entities that need updates each frame):
public override void Update(GameTime gameTime)
{
    foreach (KeyValuePair<string, baseentity&rt; pair in entities)
    {
        (pair.Value).Update(gameTime);
    }
}

Just like with the MainGame class and how it adds Managers and allows users to retrieve them by name, SceneManager does the same thing with Entities:
public void AddEntityToScene(BaseEntity entity)
{
    BaseEntity checkEntity = null;
    if (entities.TryGetValue(entity.Name, out checkEntity))
    {
        throw new Exception("An entity named " + entity.Name + " already exists.");
    }

    entities.Add(entity.Name, entity);
}

public void RemoveEntityFromScene(BaseEntity entity)
{
    BaseEntity checkEntity = null;
    if (!entities.TryGetValue(entity.Name, out checkEntity))
    {
        throw new Exception("No entity named " + entity.Name + " exist in the scene to be removed.");
    }

    entities.Remove(entity.Name);
}

public BaseEntity GetEntity(String entityName)
{
    BaseEntity entity = null;
    if (!entities.TryGetValue(entityName, out entity))
    {
        // Entity wasn't found
    }

    return entity;
}
And you can see we've added a RemoveEntityFromScene method. We aren't using it yet, but it will remove the entity from the scene, but not delete the entity. If we were to multithread this engine (and maybe we will) and we wanted to add/remove component from it after it was loaded, we would make sure to lock the entity list, then remove the entity from the list, unlock the list, lock the entity, add/remove the necessary components, unlock the entity, lock the entity list, readd the entity to the list, unlock the list. Yea...fun stuff. Long story short we would need a method to remove the entity while it was having its components altered, or some other way to lock it, removing it might not be ideal because it could blip out of view.

And that's it for the SceneManager, here's the full file:
using System;
using System.Collections.Generic;
using System.Text;

using Microsoft.Xna.Framework;
using Microsoft.Xna.Framework.Content;
using Microsoft.Xna.Framework.Graphics;

using SimpleGameEngine.Entity;
using SimpleGameEngine.Components;
using SimpleGameEngine.GeometricPrimitives;

namespace SimpleGameEngine.Scene
{
    public class SceneManager : BaseManager
    {        
        private Dictionary<String, BaseEntity> entities;        
        public Dictionary<String, BaseEntity> Entities
        {
            get { return entities; }
        }        

        public ContentManager Content
        {
            get { return Game.Content; }
        }

        protected override String GetName()
        {
            return "Scene";
        }

        public SceneManager(MainGame Game)
            : base(Game)
        {
            this.entities = new Dictionary<string, BaseEntity>();

            Initialize();
        }

        protected override void Initialize()
        {
            base.Initialize();
        }

        public override void LoadContent()
        {
            // We always have at least one entity in the world. We'll create that now and then
            // make it our main camera for the game.
            BaseEntity entity = new BaseEntity(this, EngineCommon.RootEntityName);

            // The component will automatically attach to the entity that we pass into it
            CameraComponent camComp = new CameraComponent(entity);

            // Now we add the entity to the scene
            AddEntityToScene(entity);

            // ===================================================================================
            // TEMPORARY!!!!!!!!!!!!!!!!!!!!!!!!!!
            BaseEntity testCube = new BaseEntity(this, "Cube");
            testCube.position = new Vector3(0, 0, -10);

            RenderComponent rendComp = new RenderComponent(testCube, GeometricPrimitiveType.Cube);

            AddEntityToScene(testCube);
            // ===================================================================================
        }

        public override void Update(GameTime gameTime)
        {
            foreach (KeyValuePair<String, BaseEntity> pair in entities)
            {
                (pair.Value).Update(gameTime);
            }
        }

        public void AddEntityToScene(BaseEntity entity)
        {
            BaseEntity checkEntity = null;
            if (entities.TryGetValue(entity.Name, out checkEntity))
            {
                throw new Exception("An entity named " + entity.Name + " already exists.");
            }

            entities.Add(entity.Name, entity);
        }

        public void RemoveEntityFromScene(BaseEntity entity)
        {
            BaseEntity checkEntity = null;
            if (!entities.TryGetValue(entity.Name, out checkEntity))
            {
                throw new Exception("No entity named " + entity.Name + " exist in the scene to be removed.");
            }

            entities.Remove(entity.Name);
        }

        public BaseEntity GetEntity(String entityName)
        {
            BaseEntity entity = null;
            if (!entities.TryGetValue(entityName, out entity))
            {
                // Entity wasn't found
            }

            return entity;
        }
    }
}

In Part 3 we will go over BaseEntity, and BaseComponent.

Wednesday, November 16, 2011

Let's Make a Game Engine for XNA 4.0r, Prologue

I was in the middle of making a simple game engine framework so I could start writing blog posts about things like creating camera, input systems, terrain systems, spatial partitioning, etc., when I realized that I should document the actual creation of the framework.

I chose XNA for a few reasons:
1.) I'm already familiar with it after having developed a game engine for it: http://quickstartengine.codeplex.com/
2.) It's fast for prototyping
3.) It handles the back-end for a lot of mundane things like creating a Window, handling Windows messaging, handling DirectX. All of that means less I have to explain here on my blog, and that lets us get to the interesting parts more quickly.

You'll need some familiarity with Visual Studio 2010:
XNA 4.0r runs only in Visual Studio 2010. Luckily it works in the free version of VS2010 C# Express, which you can get here: http://www.microsoft.com/visualstudio/en-us/products/2010-editions/visual-csharp-express

The upcoming blog posts assume you know C#:
XNA runs within C#. If you do not know C# then you may want to stop now and spend a couple of days getting a basic rundown of C#. When I first started with XNA I knew only C++, I picked up enough about C# in about 8 hours to start making simple games in XNA. If you know C++ or Java fairly well then you can probably pick up the basics of C# pretty quickly.

If you're not familiar with XNA:
I would recommend at least spending a few hours looking a few simple tutorials to learn about some of the main functionality, how to create a project, and how the content pipeline works.
These links should cover just enough for you to grasp what you'll need to make this game engine.:
http://www.xnadevelopment.com/tutorials/gettingstartedwithxnadevelopment/GettingStartedWithXNADevelopment.shtml
http://www.xnadevelopment.com/tutorials/creatinganewxnagameproject/CreatingANewXNAWindowsGameProject.shtml
http://www.xnadevelopment.com/tutorials/addinganimagetothegameproject/AddingAnImageToTheGameProject.shtml

Ok, if you made it this far you are reasonably familiar with Visual Studio 2010 Express, C# and XNA 4.0r. Now we can continue on to Part 1 of this series.

Let's Make a Game Engine for XNA 4.0r, Part 1, BaseManager and RenderManager

Getting even a simple game engine running is no small task, but once you've created one you'll start to have a grasp over all of the different techniques and systems that come together to make one. Our first milestone (version 0.1) will be to create a couple of simple hierarchies of Main Game Interface -> System Managers, and Entity -> Components, create methods of easily communicating between all systems, and to create a simple primitive shape and render it on the screen.

There's two ways that I recommend that you continue:
1.) Download version 0.1, and have it open side by side with your own project, and write it yourself as you follow along on this blog.
2.) Download version 0.1, and have it open and use it as a reference as you follow along on this blog.

Method #1 is probably more thorough, and as you type through everything you're probably more likely to grasp the engine architecture and be familiar with it.
Method #2 will save you a lot of time but you may have to glance through things a few times before you're comfortable with it.

Whichever way you choose I recommend downloading the project, because I won't be explaining every single line of code on the blog, only the parts worth mentioning.

Alright, lets begin, at the beginning, of course.

Create a Windows XNA project (this engine may or may not work for the Xbox 360 as well, I do not currently have a subscription to test it). I named mine 'SimpleGameEngine'. I then changed the name of the main project to 'GameEngine', and the name of the content project 'EngineContent'. Name yours whatever you would like, but I will refer to them from here on by these names. Additionally I named my Xna.Game class MainGame and changed the name of the file to Main.cs.

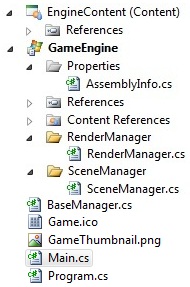
The first thing we're going to focus on is the SceneManager and RenderManager classes, and the class that all Managers derive from, BaseManager. Create a class named 'BaseManager.cs' and place it directly within the GameEngine project. Create 'SceneManager' and 'RenderManager' folders. After making those folders, within the 'SceneManager' folder add a new class called 'SceneManager.cs', and within the 'RenderManager' folder add a new class called 'RenderManager.c's. After doing so my folder structure looked something like this:


BaseManager
Ok let's start with the BaseManager class. This is a simple abstract class that contains a couple things that all Manager classes must have, like a name and reference to the MainGame, and some common virtual functions.

Here's the variable and accessors for BaseManager.
private MainGame game;
public MainGame Game
{
    get { return this.game; }
}
        
public String Name
{
    get { return this.GetName(); }
}
Notice the accessor for 'name' calls a virtual function 'GetName()'. This is because the name of the manager is determined by the derived class, not this base class.

Here's the definition for the 'GetName' function:
// Name of the manager
protected abstract String GetName();
This is an abstract function so all derived classes must handle it.

Alright let's get the constructor made. At the very least we'll need the reference to MainGame given to use when the Manager is created, so that's the only variable needed for this base class:
public BaseManager(MainGame game)
{
     this.game = game;
}

All derived Manager classes will call Initialize upon being constructed, this give the base class a change to register this Manager class with the MainGame.
protected virtual void Initialize()
{
    this.game.AddManager(this);
} 
We make this protected so it cannot be called outside of a derived Manager class, and we make it virtual so that when it's called by the derived class it gives that class a chance to handle Initialization before calling the BaseManager.

And the rest of the class is just virtual methods that are defined to be passed to derived classes:

public virtual void LoadContent() {}
public virtual void UnloadContent() {}
public virtual void Update(GameTime gameTime) {}
public virtual void Draw(GameTime gameTime) {}

Here's the code for the entire BaseManager class:
using System;
using System.Collections.Generic;
using System.Text;

using Microsoft.Xna.Framework;

namespace SimpleGameEngine
{
    abstract public class BaseManager
    {
        private MainGame game;
        public MainGame Game
        {
            get { return this.game; }
        }
        
        public String Name
        {
            get { return this.GetName(); }
        }

        public BaseManager(MainGame game)
        {
            this.game = game;
        }

        public virtual void LoadContent() {}
        public virtual void UnloadContent() {}
        public virtual void Update(GameTime gameTime) {}
        public virtual void Draw(GameTime gameTime) {}

        protected virtual void Initialize()
        {
            this.game.AddManager(this);
        }        

        // Name of the manager
        protected abstract String GetName();
    }
}

RenderManager
The first thing we'll do is make RenderManager derive from BaseManager:
public class RenderManager : BaseManager

Now, we need to handle the abstract method 'GetName' from the base class. If we ever want to look for the RenderManager in our engine we'll be able to do it by name, that is what this function with help with. We want the user to be able to look for it by the name "Render". So our function is this:
protected override String GetName()
{
    return "Render";
}

Ok we still need to create a constructor for this class. Because the BaseManager requires a MainGame, we need it as well so we can pass it through. And in the case of this class it's all we'll need:
public RenderManager(MainGame game)
    : base(game)
{            
    Initialize();
}
As I said in 'BaseManager', all Managers call Initialize() during construction. If you don't handle anything within this derived class during initialization then you don't technically need to create a function handler for it, but there's a good chance we'll need it eventually so let's just add it:
protected override void Initialize()
{
    base.Initialize();
}

Because the RenderManager is manager of all things rendering I put an accessor here to the Xna.Game class' GraphicsDeviceManager and Graphics Device:
public GraphicsDeviceManager Graphics
{
    get { return this.Game.Graphics; }
    set { this.Game.Graphics = value; }
}

public GraphicsDevice GraphicsDevice
{
    get { return this.Game.GraphicsDevice; }
}

I also moved the SpriteBatch instance out of MainGame
private SpriteBatch spriteBatch;
public SpriteBatch SpriteBatch
{
    get { return spriteBatch; }
}

The render manager has a single BasicEffect that is used for rendering (at least at this point in time). So we'll create the variable for it, and a function to load the effect:
private BasicEffect effect;

private void LoadBasicEffect()
{
    effect = new BasicEffect(this.GraphicsDevice);
    effect.EnableDefaultLighting();
}

Try and keep your variables at the top/bottom of your code, and your functions on the other side. Don't mix them. The samples I'm posting just show the relationship between them, it doesn't imply they'll go next to each other in the final product.

We'll also want a String variable to hold the name of the currently rendering camera.
private String currentCameraEntityName = EngineCommon.RootEntityName;

'EngineCommon' and 'RootEntityName' are defined in another file we'll get to soon. Don't expect your code to compile until we reach the first milestone.

LoadContent is called on all Managers when the MainGame begins its LoadContent phase. We'll want to handle that function to load up our BasicEffect and SpriteBatch:
public override void LoadContent()
{
    LoadBasicEffect();

    // Create a new SpriteBatch, which can be used to draw textures.
    spriteBatch = new SpriteBatch(this.GraphicsDevice);
}

And finally we're left with the Draw function. Pay close attention to this part because it involves some engine architecture discussion.


  • The MainGame class (which we haven't filled out yet) holds a list of all managers, of which there are currently just SceneManager and RenderManager.
  • SceneManager holds all of the entities loaded into the scene.
  • Each entity can hold multiple components, but only one per type.
  • CameraComponent is just one of any number of components we may eventually have, it is an example of a component that an entity can have.

So back to the Draw() function. What we want to do during the draw phase is get all entities in the scene, grab their render descriptions, and grab the camera, and use the camera's properties to render with. So how do we get all the information from within the RenderManager? The arrows in the above image represent the areas we need to go. As we just said above, the SceneManager holds all entities, so we need to get the entities from there, and the CameraComponent on the current rendering camera will have camera-specific information we need.

As we'll see later, the MainGame class lets us access any Manager class by its name, which in the case of the SceneManager is "scene". Once we have access to the SceneManager it in turn has a method to let us access all an entity by name. We use the camera's name (which we'll learn about later) to find the entity that is currently serving as the camera. SceneManager also has the functionality to let us grab all entities in the scene, so we grab that list as well.

And now based on all of that, we can render the scene:
public override void Draw(GameTime gameTime)
{
    SceneManager sceneMgr = this.Game.GetManager("Scene") as SceneManager;
    if (null == sceneMgr)
    {
        throw new Exception("Scene manager not registered properly to the game engine");
    }

    BaseEntity cameraEntity = sceneMgr.GetEntity(currentCameraEntityName);
    if (null == cameraEntity)
    {
         throw new Exception("A camera entity must always exist if we are trying to render a scene");
    }

    CameraComponent camComp = cameraEntity.GetComponent("Camera") as CameraComponent;
    if (null == camComp)
    {
        throw new Exception("An entity was designated as a camera but never given a camera component");
    }

    this.GraphicsDevice.Clear(Color.CornflowerBlue);

    List<renderdescription> renderDescriptions = new List<renderdescription>();

    // Get all entities in the scene
    Dictionary<string, baseentity> entities = sceneMgr.Entities;

    foreach (KeyValuePair<string, baseentity> pair in entities)
    {
        (pair.Value).Draw(gameTime, renderDescriptions);                
    }

    foreach (RenderDescription desc in renderDescriptions)
    {
        if (null != desc.model)
        {
            // Copy any parent transforms.
            Matrix[] transforms = new Matrix[desc.model.Bones.Count];
            desc.model.CopyAbsoluteBoneTransformsTo(transforms);

            // Draw the model. A model can have multiple meshes, so loop.
            foreach (ModelMesh mesh in desc.model.Meshes)
            {
                // This is where the mesh orientation is set, as well 
                // as our camera and projection.
                foreach (BasicEffect effect in mesh.Effects)
                {                            
                    effect.World = desc.worldTransform;
                    effect.View = Matrix.CreateLookAt(cameraEntity.position,
                        Vector3.Zero, Vector3.Up);
                    effect.Projection = Matrix.CreatePerspectiveFieldOfView(
                        MathHelper.ToRadians(45.0f), camComp.AspectRatio, 1.0f, 5000.0f);
                }
                // Draw the mesh, using the effects set above.
                mesh.Draw();
            }
        }
        else if (null != desc.geoPrim)
        {
            // Set our vertex declaration, vertex buffer, and index buffer.
            this.Game.GraphicsDevice.SetVertexBuffer(desc.geoPrim.VertexBuffer);
            this.Game.GraphicsDevice.Indices = desc.geoPrim.IndexBuffer;
                    
            foreach (EffectPass effectPass in effect.CurrentTechnique.Passes)
            {
                effect.World = desc.worldTransform;
                effect.View = Matrix.CreateLookAt(cameraEntity.position,
                          (cameraEntity.position + cameraEntity.rotation.Forward), Vector3.Up);
                effect.Projection = Matrix.CreatePerspectiveFieldOfView(
                          MathHelper.ToRadians(45.0f), camComp.AspectRatio, 1.0f, 5000.0f);
            
                effectPass.Apply();

                int primitiveCount = (desc.geoPrim.Indices.Count / 3);

                this.Game.GraphicsDevice.DrawIndexedPrimitives(PrimitiveType.TriangleList, 0, 0,
                                             desc.geoPrim.Vertices.Count, 0, primitiveCount);

            }
        }
    }
}

You can see here we get the scene manager and store it (and make sure it's valid). We grab the camera entity as well, and then specifically grab its camera component because that has the aspect ratio information we'll need.

We then create a list of render descriptions and then call Draw() on all entities, passing the list to each entity. As we'll see later entities that have render components simply add to that list their own model or primitive.

One we have the list of render descriptions we simply go through each one in the list and render the model or the primitive.

Here's the code for the entire RenderManager:
using System;
using System.Collections.Generic;
using System.Text;

using Microsoft.Xna.Framework;
using Microsoft.Xna.Framework.Graphics;

using SimpleGameEngine.Scene;
using SimpleGameEngine.Entity;
using SimpleGameEngine.Components;

namespace SimpleGameEngine.Render
{
    public class RenderManager : BaseManager
    {
        public GraphicsDeviceManager Graphics
        {
            get { return this.Game.Graphics; }
            set { this.Game.Graphics = value; }
        }        

        public GraphicsDevice GraphicsDevice
        {
            get { return this.Game.GraphicsDevice; }
        }

        private SpriteBatch spriteBatch;
        public SpriteBatch SpriteBatch
        {
            get { return spriteBatch; }
        }

        private BasicEffect effect;

        private String currentCameraEntityName = EngineCommon.RootEntityName;

        protected override String GetName()
        {
            return "Render";
        }

        public RenderManager(MainGame game)
            : base(game)
        {            
            Initialize();
        }

        protected override void Initialize()
        {
            base.Initialize();
        }

        public override void LoadContent()
        {
            LoadBasicEffect();

            // Create a new SpriteBatch, which can be used to draw textures.
            spriteBatch = new SpriteBatch(this.GraphicsDevice);
        }

        private void LoadBasicEffect()
        {
            effect = new BasicEffect(this.GraphicsDevice);
            effect.EnableDefaultLighting();
        }

        public override void Draw(GameTime gameTime)
        {
            SceneManager sceneMgr = this.Game.GetManager("Scene") as SceneManager;
            if (null == sceneMgr)
            {
                throw new Exception("Scene manager not registered properly to the game engine");
            }

            BaseEntity cameraEntity = sceneMgr.GetEntity(currentCameraEntityName);
            if (null == cameraEntity)
            {
                throw new Exception("A camera entity must always exist if we are trying to render a scene");
            }

            CameraComponent camComp = cameraEntity.GetComponent("Camera") as CameraComponent;
            if (null == camComp)
            {
                throw new Exception("An entity was designated as a camera but never given a camera component");
            }

            this.GraphicsDevice.Clear(Color.CornflowerBlue);

            List<renderdescription> renderDescriptions = new List<renderdescription>();

            // Get all entities in the scene
            Dictionary<string, baseentity> entities = sceneMgr.Entities;

            foreach (KeyValuePair<string, baseentity> pair in entities)
            {
                (pair.Value).Draw(gameTime, renderDescriptions);                
            }

            foreach (RenderDescription desc in renderDescriptions)
            {
                if (null != desc.model)
                {
                    // Copy any parent transforms.
                    Matrix[] transforms = new Matrix[desc.model.Bones.Count];
                    desc.model.CopyAbsoluteBoneTransformsTo(transforms);

                    // Draw the model. A model can have multiple meshes, so loop.
                    foreach (ModelMesh mesh in desc.model.Meshes)
                    {
                        // This is where the mesh orientation is set, as well 
                        // as our camera and projection.
                        foreach (BasicEffect effect in mesh.Effects)
                        {                            
                            effect.World = desc.worldTransform;
                            effect.View = Matrix.CreateLookAt(cameraEntity.position,
                                Vector3.Zero, Vector3.Up);
                            effect.Projection = Matrix.CreatePerspectiveFieldOfView(
                                MathHelper.ToRadians(45.0f), camComp.AspectRatio,
                                1.0f, 5000.0f);
                        }
                        // Draw the mesh, using the effects set above.
                        mesh.Draw();
                    }
                }
                else if (null != desc.geoPrim)
                {
                    // Set our vertex declaration, vertex buffer, and index buffer.
                    this.Game.GraphicsDevice.SetVertexBuffer(desc.geoPrim.VertexBuffer);
                    this.Game.GraphicsDevice.Indices = desc.geoPrim.IndexBuffer;
                    
                    foreach (EffectPass effectPass in effect.CurrentTechnique.Passes)
                    {
                        effect.World = desc.worldTransform;
                        effect.View = Matrix.CreateLookAt(cameraEntity.position,
                            (cameraEntity.position + cameraEntity.rotation.Forward), Vector3.Up);
                        effect.Projection = Matrix.CreatePerspectiveFieldOfView(
                            MathHelper.ToRadians(45.0f), camComp.AspectRatio,
                            1.0f, 5000.0f);
                        effectPass.Apply();

                        int primitiveCount = (desc.geoPrim.Indices.Count / 3);

                        this.Game.GraphicsDevice.DrawIndexedPrimitives(PrimitiveType.TriangleList, 0, 0,
                                                             desc.geoPrim.Vertices.Count, 0, primitiveCount);

                    }
                }
            }
        }
    }
}

In part 2, we go over the SceneManager and MainGame classes.

Saturday, November 12, 2011

MMO Architecture: Creating a ghosting system

In this post I will talk about a common part of an MMO's internal architecture, often referred to as ghosting. Ghosting is how the server tells the client about the world loading around the player as that player moves through the world. Because MMOs are often open-world games you cannot simply have the player load up all of the objects in the entire zone they're in, the game just couldn't run like that on a single player's computer. On top of that the server would have to constantly update every player about every thing happening within a zone, which would create bandwidth issues for both clients and server.

I'll discuss a few different, but similar, ways that ghosting can be achieved (I'm sure there are other ways as well). First of all, the server will only need to send down information of objects in the world that are not environmental, for example there is no need to send information to a client about a tree they're in range of, because that tree is likely static and can never change. The client will know about that tree based on assets/files on their own computer. The server will have an easy way to know which objects have information that can change (like their position, or stats, or state, etc...), so the main work the server will need to do is determine which of these networked objects are close enough to the player to tell the client about.

Method #1: Ghosting objects within a proximity around the player
With most physics engine the most efficient way to ghost objects within a proximity of the player is to give the player an axis-aligned bounding box (AABB). Axis-aligned shapes will have smaller broadphase sizes, which will result in them being checked against less objects for collision. Attach an AABB to a player on the server, and whichever networked objects collide with this box are entered into a list to send updates to the player about. Whenever the object un-collides with the bounding box then the server can tell the client to unload that object. Generally this bounding box is large enough the player doesn't see all of the objects loading and unloading right around them.

Method #2: Ghosting objects that have players in their proximity
This method is similar to the last method in that we're ghosting objects to clients based on proximity to those objects, the difference here is that rather than attaching an AABB to the player, you instead put AABBs on the networked objects instead. This method has its pros and cons. On the plus side this allows designers and engineers to tweak the distances that an object with ghost down to the player, on a per object basis. This means that if an object is deemed to be a higher priority than other objects then designers can increase the distance as which they'll ghost to players. The down side to this method is that it will use more memory and hit performance a bit more on the server, this is because you have potentially many more AABBs in the world checking for collisions.

Method #3:  Distance checking
This method is similar to method #1 in that it is proximity-based. This method entails mathematically brute force checking the player's position against the position of ghosted objects nearby. To realistically use this in a large-world MMO you would need some kind of spatial partitioning in your world so you knew which sub-set of objects were close enough to the player to do distance checking again, otherwise you'd likely be doing hundreds of distances checks per frame per player, possibly many more. If you already have spatial partitioning in your world you may not even need this method, which leads me to Method #4.

Method #4: Spatial partitioning
If your MMO's world is using a decent spatial partitioning algorithm to sort the scene then the server may already know which networked objects are close enough to the player, and could send those objects down. This method is the least expensive in terms of how expensive the ghosting is, however the spatial partitioning itself has a decent expense to it most of the time, so if ghosting was your only reason for using spatial partitioning on the server, then you're probably just as well off using Method #1 so long as you have a decent physics engine (as most physics engines have their own spatial partitioning anyway).

The above methods will allow you gather the objects that a client will care about. From here it's fairly simple, when the objects first enter range of the player (or the player first enters the object's range), you send the player an initial packet with the full current info about the object, and any changes that need to be networked while that object is in range will also go the player. This allows the player to get the full info as objects enter range so that they can see that object in the same state that the server does, and then it should receive any changes from the server object while it's in range as well. Combining all of this gives you a basic but fairly complete ghosting system for an MMO.

Havok: Setting mesh color in the Visual Debugger, Part 2

In part 1 of this series I showed you how to colorize your physics meshes in the Havok Visual Debugger (HVD). However as you may have noticed, this only works for colorizing meshes that are already loaded in the HVD, so if you connect the HVD to the game after those colors have been set you will not see that information. Here's a simple way to get around that problem.

You program is likely directly using an hkVisualDebugger, what you will need to do is derived a new class from hkVisualDebugger. The hkVisualDebugger class has an m_clients variable, but it's access is protected, and there is no accessor to its information in hkVisualDebugger so unless you have the actual source code for Havok, you're going to need to derive your own class from hkVisualDebugger so you can create an accessor to the data that you need.

Create a new header file in your project, name it 'PhysicsVisualDebugger' or whatever class name you would like to use. The code below is the entire class, no .cpp file is needed.

#pragma once

#ifndef __PhysicsVisualDebugger_h_
#define __PhysicsVisualDebugger_h_

#include <common\visualize\hkvisualdebugger.h>

class PhysicsVisualDebugger : public hkVisualDebugger
{
public:
    PhysicsVisualDebugger(const hkArray<hkProcessContext*>,
                          const class hkVtableClassRegistry* classReg = HK_NULL)
         : hkVisualDebugger(contexts, classReg)
    {}

    virtual ~PhysicsVisualDebugger() {};

    unsigned int GetNumClients() const { return m_clients.getSize(); }
};

#endif //__PhysicsVisualDebugger_h_


Make sure any place you were using an 'hkVisualDebugger' that you're not using your new class you've just made.
The goal we're aiming for is to know when somebody connects the HVD to your program. The GetNumClients() above will return to you the number of current clients connected, if you call it at the appropriate time you can compare it to check if that number has just increased.

In my example below, 'm_pDebugger' is a pointer to a 'PhysicsVisualDebugger'. Put this code wherever you're currently stepping the HVD.

unsigned int numConnections = m_pDebugger->GetNumClients();

// Update the debuggers (which also checks for new clients)
m_pDebugger->step(m_fStepLength);

// If there are now more connections than before the update
if ( m_pDebugger->GetNumClients() > numConnections )
{
    // This is where you will want to go through all physics
    // objects and have to re-send their color info to the
    // debugger.
    UpdateDebuggerInfoForAllEntities();
}

Notice we query the number of connections before stepping the debugger, store that number, and then after stepping the debugger we query for number of connections again. If the number of clients has increased, then you should find a way of having all of your objects resend their color information to the HVD. In my case whenever I add an object to the Havok world, I keep track of its pointer in a list so I can call a function on everything in that list at any time to have them refresh their information for the HVD.

Why Gamebryo was "fun"

If you didn't catch it in the title, there was some sarcasm in there. Gamebryo (the game engine used to make LEGO Universe as well as other titles such as Fallout 3, Oblivion, Epic Mickey, and more) had some very annoying quirks that made my life a little bit more difficult, as well as some of my coworkers'.

Both the Matrix and the Quaternion classes had multiple ways to create rotations, and naturally Gamebryo used no naming convention between these two classes.

Create a Rotation from the X axis and an angle?
Matrix function: MakeXRotation(float angle)
Quaternion function: FromAngleAxisX(float angle)

Gamebryo included a lot of functionality in either the Matrix or Quaternion classes, but not both. It's like a cruel joke.

Want to make your matrix an identity matrix? Call 'MakeIdentity( )'. Want to do that with a Quaternion? Do it yourself, there is no function.

Want to lerp (linearly interpolate) a Quaternion? Go for it. Want to lerp a Matrix? Sorry, convert it to a Quaternion, lerp it, then convert it back to a matrix. On top of that, the Slerp (spherical linear interpolation) did not even work properly with Gamebryo, often causing objects to rotate 350 degrees to get to the target, rather than 10 degrees. We ended up discontinuing the use of Gamebryo's Slerp method altogether and calling to Havok to have it do the rotations for us. Alternatively we could have just rolled our own Slerp code or altered Gamebryo's version to use ours, but Gamebryo made calls internally to its Slerp method so we didn't want to break something by fixing something.

Gamebryo also thought it would be cute to use opposite rotation directions for matrices vs. quaternions. Those two rotation functions I listed earlier, if you want to represent the same rotation with a matrix as well as a quaternion you pass a positive angle into one, and a negative angle into the other. It's always fun to try and remember which way you need to rotate which type depending on the case you were using it in. Gamebryo likes to make sure the programmer is paying attention I guess.

Here's another little chestnut that Gamebryo left me to deal with. Their camera coordinate system has a 'forward' vector of X, rather than Z. Seriously? What game has EVER done that? For those new to game programming, about 90% of games use the X-axis as a 'right' vector, and Z as a 'forward', the other 10% use the Y-axis as the forward and the Z-axis as the 'up'. But I had never seen an X-axis be used for a 'forward' before. There was no way we were going to use the X-axis as the forward for LEGO Universe, so we ended up having to deal with Gamebryo's wacky camera coordinate system. It was always a fun task when trying to do something that involved aligning the camera based on a rotation that was in another system, you'll set them to the same rotations and then rotate the camera 90 degrees to line it up.

I might go more into some annoyances using Gamebryo later, but for now I'm still bound to an NDA on most subjects.

Calculus: Network prediction, calculating time to travel a distance

In the last post we talked about how we could calculate how far something traveled over a specific amount of time based on its velocity and acceleration. In that post we were left with a problem, we know our origin and destination positions, and how much time has elapsed, and after a certain amount of time we found we had past the destination. What we really need to know now is how long it will take us to get to our destination given our velocity and acceleration, that way we know how much time is left after we got to the destination.


Given the path above, we had calculated that after 1 second we were almost to P2 if we had started at P1. But what if the client's game had stuttered for 2 full seconds? Where would we put them along the way then? Well, to know that we need to know how long it takes to get from P1 to P2.

Here is the formula for calculating how long is takes to travel a specific distance given an initial velocity and a constant acceleration:

't' is time, v(i) is initial velocity, 'a' is acceleration, and 'd' is the distance between the points.

Our initial velocity is 5 meters per second.
Our constant acceleration is 3.591849, which we calculated in the last blog post.
Distance is 8.9796225, which was also calculated in the last blog post.

If we plug the numbers in we get:
Time = ( -5 + √(5² + 2 * 3.591849 * 9.9796225) ) / 3.591849
        = ( -5 + √(25 + 71.690594) ) / 3.591849
        = ( -5 + √96.690594 ) / 3.591849
        = ( -5 + 9.8331375 ) / 3.591849
        = 4.8331375 / 3.591849
Time = 1.3455868 seconds

And here's the code:
float CalcTimeOverDistance( float initVelocity, 
                            float constantAccel,
                            float distance )
{
    if ( distance <= 0.0f )
    {
        return 0.0f;
    }

    // If there is an acceleration present
    if ( constantAccel != 0.0f )
    {
        float initVelSqr = initVelocity * initVelocity;

        return (-initVelocity 
                + sqrt(initVelSqr + (2*constantAccel*distance))
                / constantAccel;
    }
    else  // No acceleration was present
    {
        if ( initVelocity == 0.0f )
        {
            // No velocity or acceleration means infinite
            // time required, just return 0.0f, or whatever
            // value you want to return in this case.
            return 0.0f;
        }
        else
        {
            return ( distance / initVelocity );
        }
    }
}
So now we can see that the platform will reach P2 in only 1.3455868 seconds, and because the client stuttered for 2 seconds that leaves us 0.6544132 seconds we need to predict. The next step is to see how much time it takes to get from P2 to P3, and if that is greater than 0.6544132 seconds than we need know we're not to P3 yet and we can calculate how far we've traveled between P2 and P3. 

Alright, time to figure out some values:
Difference vector between P2 and P3 = (18 - 10, 5 - -3) = (8, 8)
Length of difference vector = √(8² + 8²) = √128 = 11.3137085
Constant accel = (5² - 10²) / (2 * 11.3137085) = (25 - 100) / 22.627417 = -3.3145630

Notice our constant acceleration was negative, that is because we slow down when going from P2 to P3. Now that we have all of our values we can calculate the time it takes to travel distance from P2 to P3 given the initial velocity, and the acceleration we just calculated.

Time = (-10 + √(-10² + 2 * -3.3145630 * 11.3137085) ) / -3.3145630
         = (-10 + √(100 + -75.0) ) / -3.3145630
         = (-10 + 5 ) / -3.3145630
         = -5 / -3.3145630

Time = 1.5084944 seconds

We can clearly see that the time we have remaining (~0.65 seconds) isn't enough to reach P3 (~1.51 seconds), so lets see how far we make it.

Distance = 10 * 0.6544132 + (-3.3145630 * 0.6544132² * 0.5)
               = 6.544132 + (-3.3145630 * 0.4282566 * 0.5)
               = 6.544132 + -0.7097417

Distance = 5.8343903 meters

And now we need to figure out the direction, which we have some of the data for from earlier:

Inverse length of difference vector = 1 / 11.3137085 = 0.08838835
Unitized difference vector from P2 to P3 = (8 * 0.08838835, 8 * 0.08838835)
                                                                 = (0.7071068, 0.7071068)

And now that we have distance and direction, we multiply them and add it to P2 to get our final position after 2 seconds:

Position = P2 + ( distance * direction )            
              = (10, -3) + ( 0.7071068 * 5.8343903, 0.7071068 * 5.8343903 )
              = (10, -3) + ( 6.5414971, 6.5414971 )

Position = ( 16.5414971, 3.5414971 )

And there we have it, we just predicted the position of a platform 2 seconds into the future along a strict path.

Friday, November 11, 2011

Calculus: Network prediction, calculating distance over time

I've actually found that I rarely need to use any calculus in most game programming I run into. Games are generally frame-based, and as such you can generally just update variables each frame by the elapsed time. One of the main benefits of calculus is when you need to know what a value is at any given point in time, so it's very valuable when you're trying to predict where something will be after a given amount of time, and prediction is very common in any networked game.

I used a similar method to this while developing LEGO Universe's moving platform system, a system which lets the player ride upon a moving object to travel short or long distances. If a client's program had hitched for a small amount of time while on the platform, the platform would naturally see a larger gap of time had elapsed, and Havok's physics would usually accurately calculate where the platform should end up. However, we had to limit how much time we were able to skip all at once because if the client make their game hitch for a long period of time, say 5 seconds, and we let Havok just move everything ahead 5 seconds based on their current velocity, we could potentially have the player going places where they shouldn't be able to go. I can go into more detail some other time on this subject, but suffice to say we couldn't always just allow the game to move objects large distances because a large time had elapsed between frames.

The moving platform system had unique prediction algorithms because it had invisible predefined rails it had to stay on, and at each waypoint it had a speed it must be traveling at the moment it got to that point. Based on defined points on these paths, and speeds at those points, we should be able to determine exactly where a moving platform should be after any amount of elapsed time.

The image below represents a simple path for a moving platform to follow, and at each point I've labeled the speed that moving platform must be going at the time it reaches at point. So basically what this image says is when the platform leaves P1, it will be moving at 5 meters per second, and it will have a constant acceleration all the way to P2, and by the time it reaches P2 it will be moving at 10 meters per second. As it leaves P2 it will decelerate constantly such that it will be moving at 5 meters per second as it reaches P3. Long story short, it speeds up until it gets to P2, and then slows down again as it reaches P3.

In order to calculate where a platform could be at any time we need to know its acceleration. If the platform wasn't accelerating, calculating it's position at any time would be extremely simple, and would just be:
Position += Velocity * Time;

But because velocity is constantly changing as the platform speeds up and slows down along its journey, we'll need calculus to tell us what the acceleration is between the two points a platform currently lies, and then we can use that acceleration to calculate the distance traveled.


So to keep the scenario as simple as possible, lets just calculate where the platform will be after 1 second if it begins at P1.

Difference vector from P1 to P2 = (10 - 0, -3 - 0) = (10, -3)
Length of difference vector = √(10² + -3²) = √(100 + 9) = √109 = 10.440306 meters

The formula for calculating constant acceleration is:


v(f) is final velocity, v(i) is the initial velocity, and 'd' is distance it will be travelling.

The code for this is:
float CalculateConstantAccel(const float initVelocity, 
                             const float finalVelocity,
                             const float distance)
{
    if ( distance <= 0.0f )
    {
        return 0.0f;
    }
    
    float finalVelocitySqr = finalVelocity * finalVelocity;
    float initVelocitySqr = initVelocity * initVelocity;
    
    return (finalVelocitySqr - initVelocitySqr)
           / (2 * distance);
}
Plugging our values in we get:
Acceleration = (10² - 5²) / (2 * 10.440306) = (100 - 25) / 20.880612 = 3.591849
Knowing our constant acceleration, we can now calculate where the platform will be in 1 second. Here's the formula for calculating distance over time given a constant acceleration:
'd' is distance, v(i) is the initial velocity, 't' is time, and 'a' is the acceleration we already calculated above.
The code for this is:
float CalcDistanceOverTime(const float initVelocity, 
                           const float constantAccel,
                           const float timeDelta)
{
    return  (initVelocity * timeDelta)
          + (0.5f * constantAccel * (timeDelta * timeDelta);
}

Plugging our values in we get:
Distance = 5 * 1 + ( 0.5 * 3.591849 * 1² ) = 5 * 1.7959245 = 8.9796225
So the moving platform will have traveled 8.9796225 meters after 1 second, which puts it pretty close to P2, which was 10.440306 meters away. In fact, we know the direction between P1 and P2, so if we want to put the platform where is should be we can move it there based on the distance we calculated. Our difference vector from P1 -> P2 was (10, -3). We need to unitize it to make it a direction vector, and we already have the length of the vector so that saves us another step. Inverse length is = 1 / 10.440306 = 0.0957826 Unitized difference vector is ( 10 * 0.0957826, -3 * 0.0957826 ) = (0.957826, -0.2873478) And now we just multiply our direction vector by the distance we need to travel and then add it to P1: P1 + ( distance * ( direction )); New position = (0, 0) + ( 8.9796225 * (0.957826, -0.2873478)) = ( 8.600916, -2.5802747 ) So as you can see, our position after 1 second is approx ( 8.6, -2.58 ), which puts it close to P2, which is at (10, -3).
That concludes this blog post, but here's some food for thought: What if the client's game had hitched for 2 seconds? That would've put them far past P2, so you end up needing an algorithm to figure out how much time it took to reach P2, then based on the remain time left from the original 2 seconds you have to figure out how far they went between P2 and P3. Stay tuned for the solution to this in the next blog post.